Author

thomas

Browsing

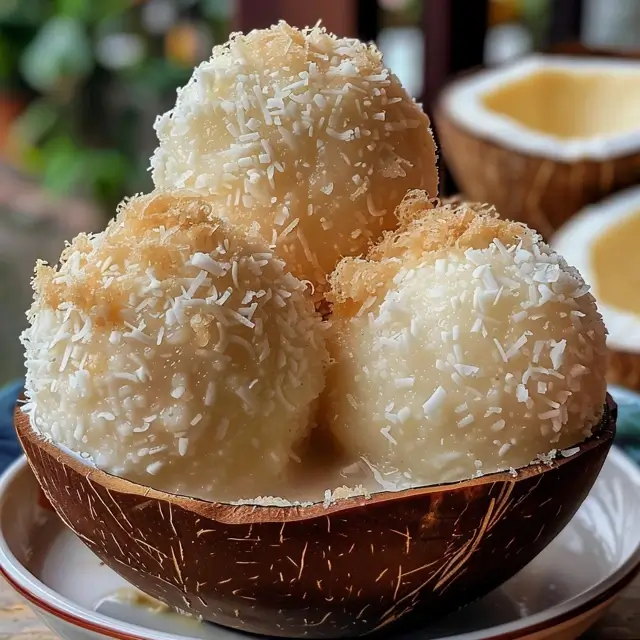
Have you ever craved a sweet treat that not only satisfies your sweet tooth but also brings a little sunshine into your day? Well, let me introduce you to Bala de Coco Baiana Tradicional! This delightful coconut candy is soft, shiny, and oh-so-delicious. Perfect for sharing with family and friends, it’s a wonderful addition to any gathering. Plus, if you’re looking for easy pasta recipes to pair with your dessert, I’ve got you covered with some quick family dinners that will make your weeknight meals a breeze!

Why You’ll Love This Recipe

  • It’s incredibly easy to make, even for beginners!
  • Perfectly soft and shiny texture that melts in your mouth.
  • Great for parties, gifts, or just a sweet treat for yourself.
  • Uses simple ingredients you probably already have at home.
  • Can be made ahead of time and stored for later enjoyment.

Ingredients

To make this delightful Bala de Coco Baiana Tradicional, you’ll need the following ingredients:

  • 2 cups of grated fresh coconut
  • 1 cup of sugar
  • 1 cup of coconut milk
  • 1 tablespoon of butter
  • 1 teaspoon of vanilla extract
  • A pinch of salt

Full ingredient list with measurements is provided in the printable recipe card below.

How to Make the Recipe

Now, let’s dive into the fun part—making this delicious treat!

  1. In a medium saucepan, combine the grated coconut, sugar, coconut milk, butter, vanilla extract, and salt.
  2. Cook over medium heat, stirring constantly until the mixture thickens and starts to pull away from the sides of the pan. This should take about 10-15 minutes.
  3. Once thickened, remove from heat and let it cool slightly.
  4. Grease your hands with a little butter and shape the mixture into small balls or squares.
  5. Place the candies on a greased plate and let them cool completely before serving.

Pro Tips for Making the Recipe

Here are some of my favorite tips to ensure your Bala de Coco turns out perfectly every time:

  • Use fresh coconut for the best flavor and texture. If fresh isn’t available, unsweetened dried coconut can work in a pinch.
  • Be patient while cooking; stirring constantly helps achieve that perfect creamy consistency.
  • Experiment with flavors! Add a bit of lime zest or a splash of rum for a tropical twist.
  • For a fun presentation, roll the candies in shredded coconut or chopped nuts before they set.

How to Serve

These delightful coconut candies are perfect for any occasion! Here are some serving suggestions:

  • Serve them at your next family gathering or potluck.
  • Package them in cute boxes as homemade gifts for friends.
  • Pair them with a cup of coffee or tea for a delightful afternoon treat.
  • Include them in a dessert platter alongside other sweets for a festive touch.

Make Ahead and Storage

One of the best things about Bala de Coco is that it can be made ahead of time! Here’s how to store them:

  • Once cooled, store the candies in an airtight container at room temperature for up to a week.
  • If you want to keep them longer, you can freeze them! Just make sure to separate layers with parchment paper to prevent sticking.
  • Thaw at room temperature before serving.

Now that you have this delightful recipe in your arsenal, you can impress your family and friends with your culinary skills! And while you’re at it, don’t forget to check out some of my favorite 30-minute meals and weeknight dinner ideas that pair perfectly with this sweet treat. Whether it’s a creamy garlic pasta or a quick family dinner, you’ll have everything you need to create a memorable meal. Enjoy your cooking adventure!

Bala de Coco Baiana Tradicional – Macia e Brilhante

Prep Time 30 minutes
Cook Time 20 minutes
Total Time 50 minutes
Servings 20 pieces
Calories 150
A traditional Brazilian coconut candy that's soft, shiny, and delicious, perfect for sharing or gifting.

Ingredients

Main ingredients

  • 1 kg açúcar cristal
  • 1 glass leite de coco (200 ml)
  • 100 ml água
  • Coco ralado seco para polvilhar coco ralado seco (opcional) (for sprinkling)
  • Margarina ou manteiga para untar a bancada (for greasing surface)

Instructions 

  • Combine sugar, coconut milk, and water in a large pan. Cook over medium heat, stirring until thickened and shiny (~20 mins). Remove from heat, let cool slightly. Shape into small balls or bars. Roll in dry coconut if desired. Let set for 15 days in a cool, dry place. Wrap in plastic or store in an airtight container.

Notes

Ensure the mixture reaches a shiny, thick consistency to achieve the best texture.
Calories: 150kcal
Cost: $15
Course: Dessert
Cuisine: Brazilian
Keyword: coconut

Are you ready to indulge in a deliciously healthy treat that will make your taste buds dance? I’m thrilled to share my recipe for Coxinha Fitness de Batata Doce com Frango! These baked delights are not only nutritious but also incredibly satisfying. Perfect for a quick family dinner or a snack that won’t derail your healthy eating goals, they’re a fantastic addition to your meal rotation. Plus, they’re so easy to make, you’ll wonder why you didn’t try them sooner!

Why You’ll Love This Recipe

  • Healthy and nutritious, packed with protein and fiber.
  • Perfect for meal prep and quick family dinners.
  • Great for kids and adults alike—everyone will love them!
  • Easy to customize with your favorite fillings.
  • Can be made ahead and stored for busy weeknights.

Ingredients

To make these delightful Coxinhas, you’ll need the following ingredients:

  • 2 medium sweet potatoes, peeled and cubed
  • 1 cup cooked shredded chicken (you can use rotisserie chicken for convenience!)
  • 1/2 cup low-fat cream cheese
  • 1/2 cup grated cheese (like mozzarella or cheddar)
  • 1 teaspoon garlic powder
  • 1 teaspoon onion powder
  • Salt and pepper to taste
  • 1 cup whole wheat breadcrumbs
  • Olive oil spray

Full ingredient list with measurements is provided in the printable recipe card below.

How to Make the Recipe

Now, let’s dive into the fun part—making these delicious Coxinhas!

  1. Preheat your oven to 400°F (200°C).
  2. Boil the sweet potatoes in a pot of salted water until tender, about 15-20 minutes. Drain and mash them in a large bowl.
  3. Add the shredded chicken, cream cheese, grated cheese, garlic powder, onion powder, salt, and pepper to the mashed sweet potatoes. Mix until well combined.
  4. Using your hands, take a small amount of the mixture and shape it into a teardrop or oval shape, just like a traditional coxinha.
  5. Roll each coxinha in whole wheat breadcrumbs until fully coated.
  6. Place the coxinhas on a baking sheet lined with parchment paper and spray lightly with olive oil.
  7. Bake for 20-25 minutes or until golden brown and crispy.
  8. Let them cool slightly before serving. Enjoy!

Pro Tips for Making the Recipe

Here are some of my favorite tips to ensure your Coxinha Fitness de Batata Doce com Frango turns out perfectly:

  • For a flavor boost, add some chopped herbs like parsley or cilantro to the filling.
  • If you want a spicier kick, mix in some diced jalapeños or a dash of hot sauce.
  • Make sure to spray the coxinhas with olive oil before baking to achieve that golden, crispy texture.
  • Feel free to experiment with different fillings, such as spinach and feta or ground turkey!

How to Serve

These coxinhas are incredibly versatile! Here are some serving suggestions:

  • Serve them with a side of homemade salsa or guacamole for dipping.
  • Pair with a fresh salad for a complete meal.
  • They make a great appetizer for parties or gatherings.
  • Enjoy them as a snack on their own or with a dollop of Greek yogurt.

Make Ahead and Storage

One of the best things about these Coxinhas is that they can be made ahead of time! Here’s how to store them:

  • After baking, let the coxinhas cool completely before storing them in an airtight container.
  • They can be kept in the refrigerator for up to 3 days.
  • For longer storage, freeze the uncooked coxinhas on a baking sheet, then transfer them to a freezer bag. They can be baked straight from the freezer—just add a few extra minutes to the baking time!

So there you have it! A delicious, healthy, and easy recipe that fits perfectly into your weeknight dinner ideas. Whether you’re looking for quick family dinners or just a tasty snack, these Coxinha Fitness de Batata Doce com Frango are sure to please. And if you’re in the mood for something different, don’t forget to check out my favorite easy pasta recipes, like creamy garlic pasta, for those busy nights when you need a 30-minute meal. Happy cooking!

Coxinha Fitness de Batata-Doce com Frango – Saudável e Assada

Prep Time 20 minutes
Cook Time 25 minutes
Total Time 45 minutes
Servings 4 porções
Calories 250
Uma versão saudável e assada da tradicional coxinha, feita com batata-doce e frango desfiado, perfeita para quem busca uma opção nutritiva e saborosa.

Ingredients

Base

  • 500 g batata-doce cozida e amassada
  • 2 colheres de sopa farinha de aveia
  • Sal e pimenta-do-reino a gosto Sal e pimenta-do-reino (a gosto)
  • 300 g frango cozido e desfiado
  • 100 g queijo cottage

Instructions 

  • Mode de preparo: Misture a batata-doce amassada, farinha de aveia, sal e pimenta até formar uma massa homogênea.
  • Prepare a massa: Misture o frango desfiado e o queijo cottage na massa, temperando a gosto.
  • Mode de modelar: Pegue uma porção da massa, modele em formato de coxinha e recheie com o frango e queijo.
  • Disposição: Disponha as coxinhas em uma assadeira untada com azeite ou papel manteiga.
  • Modo de assar: Leve ao forno preaquecido a 180°C por aproximadamente 25 minutos ou até dourar.

Notes

Para uma crocância extra, você pode passar as coxinhas em farinha de rosca antes de assar.
Calories: 250kcal
Cost: $15
Course: Lanche
Cuisine: brasileira
Keyword: assada, frango, saudável

Have you ever craved a frosting that’s not only delicious but also incredibly easy to whip up? Well, let me introduce you to my favorite treat: Glacê de Leite em Pó Cremoso. This creamy, light frosting is perfect for cakes and desserts, and it’s so simple to make that you’ll wonder why you didn’t try it sooner! Plus, it’s a fantastic addition to your repertoire of easy pasta recipes and quick family dinners. Let’s dive into this delightful recipe!

Why You’ll Love This Recipe

  • Quick and easy to prepare, making it perfect for busy weeknights.
  • Versatile enough to pair with various desserts and cakes.
  • Light and creamy texture that melts in your mouth.
  • Uses simple ingredients you likely already have at home.
  • Great for making ahead of time for special occasions.

Ingredients

To make this delightful Glacê de Leite em Pó Cremoso, you’ll need the following ingredients:

  • 1 cup of powdered milk
  • 1/2 cup of unsalted butter, softened
  • 1 cup of powdered sugar
  • 1 teaspoon of vanilla extract
  • 2-3 tablespoons of milk (adjust for desired consistency)

Full ingredient list with measurements is provided in the printable recipe card below.

How to Make the Recipe

Now, let’s get to the fun part—making this delicious frosting!

  1. In a mixing bowl, combine the softened butter and powdered sugar. Beat them together until the mixture is light and fluffy.
  2. Add the powdered milk and vanilla extract. Continue to mix until everything is well incorporated.
  3. Gradually add the milk, one tablespoon at a time, until you reach your desired consistency. You want it creamy but not too runny!
  4. Once you have the perfect texture, give it a final mix to ensure everything is blended smoothly.
  5. Now, it’s ready to spread on your favorite cake or dessert!

Pro Tips for Making the Recipe

Here are some of my favorite tips to ensure your Glacê de Leite em Pó Cremoso turns out perfectly every time:

  • Make sure your butter is at room temperature for easier mixing.
  • If you want a richer flavor, consider adding a pinch of salt to balance the sweetness.
  • For a fun twist, try adding a bit of cocoa powder for a chocolate version!
  • Don’t rush the mixing process; the fluffier the frosting, the better it will taste.
  • Feel free to experiment with different extracts, like almond or coconut, for unique flavors.

How to Serve

This creamy frosting is incredibly versatile! Here are some serving suggestions:

  • Spread it generously on your favorite chocolate or vanilla cake.
  • Use it as a filling for cupcakes or layer cakes.
  • Drizzle it over pancakes or waffles for a delightful breakfast treat.
  • Pair it with fresh fruit for a light dessert option.
  • It also makes a great dip for cookies or graham crackers!

Make Ahead and Storage

If you’re planning for a special occasion or just want to have this frosting ready for a quick dessert, you can make it ahead of time! Here’s how:

  • Store the frosting in an airtight container in the refrigerator for up to one week.
  • Before using, let it sit at room temperature for about 30 minutes to soften.
  • If it’s too thick after refrigeration, simply add a splash of milk and mix until smooth.
  • For longer storage, you can freeze the frosting for up to three months. Just thaw it in the fridge overnight before using.

Now that you have this delightful Glacê de Leite em Pó Cremoso recipe in your back pocket, you can easily elevate your desserts and impress your family and friends. It’s perfect for those busy weeknights when you need something sweet but don’t want to spend hours in the kitchen. And remember, it pairs beautifully with creamy garlic pasta or any of your favorite 30-minute meals for a complete dinner experience. Enjoy your cooking adventures, and happy baking!

Glacê de Leite em Pó – Cremoso, Leve e Fácil de Fazer

Prep Time 10 minutes
Cook Time 20 minutes
Total Time 30 minutes
Servings 10 portions
Calories 150
Um glacê cremoso, leve e fácil de fazer, perfeito para decorar bolos e tortas com sabor de leite condensado.

Ingredients

Main Ingredients

  • 1 cup leite em pó
  • 1 cup açúcar de confeiteiro
  • 0.5 cup água gelada
  • 1 sopa emulsificante
  • 1 chá essência de baunilha
  • a few drops corante alimentício

Instructions 

  • Despeje o leite em pó, o açúcar de confeiteiro, a água gelada, o emulsificante e a essência de baunilha no liquidificador.
  • Bata por aproximadamente 5 minutos até obter uma mistura cremosa e homogênea.
  • Adicione corante alimentício a gosto e misture delicadamente.
  • Utilize imediatamente ou armazene em pote fechado na geladeira por até 3 dias.

Notes

Para um glacê mais firme, adicione um pouco mais de emulsificante ou deixe na geladeira antes de usar.
Calories: 150kcal
Cost: $15
Course: Dessert
Cuisine: Brazilian
Keyword: leite em pó

Have you ever craved a dessert that feels like a warm hug? Well, let me introduce you to my favorite indulgence: Bolo Mousse de Chocolate com Canela – Cremoso e Sofisticado! This creamy and elegant chocolate and cinnamon cake is not just a treat for the taste buds; it’s a delightful experience that will make your heart sing. Perfect for those cozy family gatherings or a sweet ending to your weeknight dinner ideas, this cake is sure to impress. And the best part? It’s as easy as pie! Speaking of easy, if you’re looking for some quick family dinners or easy pasta recipes, I’ve got you covered too!

Why You’ll Love This Recipe

  • It’s a showstopper dessert that’s perfect for any occasion.
  • The combination of chocolate and cinnamon creates a unique flavor profile.
  • It’s creamy and rich, yet surprisingly light.
  • Perfect for making ahead of time for those busy weeknights.
  • It pairs beautifully with coffee or a glass of dessert wine.

Ingredients

To create this luscious Bolo Mousse de Chocolate com Canela, you’ll need the following ingredients:

  • 1 cup of all-purpose flour
  • 1 cup of granulated sugar
  • 1/2 cup of unsweetened cocoa powder
  • 1 teaspoon of baking powder
  • 1/2 teaspoon of ground cinnamon
  • 1/4 teaspoon of salt
  • 1/2 cup of unsalted butter, melted
  • 3 large eggs
  • 1 teaspoon of vanilla extract
  • 1 cup of heavy cream
  • 1/2 cup of powdered sugar
  • Chocolate shavings for garnish (optional)

Full ingredient list with measurements is provided in the printable recipe card below.

How to Make the Recipe

Now, let’s dive into the delightful process of making this cake:

  1. Preheat your oven to 350°F (175°C) and grease a 9-inch round cake pan.
  2. In a large mixing bowl, whisk together the flour, granulated sugar, cocoa powder, baking powder, ground cinnamon, and salt.
  3. Add the melted butter, eggs, and vanilla extract to the dry ingredients. Mix until well combined.
  4. Pour the batter into the prepared cake pan and smooth the top with a spatula.
  5. Bake for 25-30 minutes or until a toothpick inserted in the center comes out clean.
  6. While the cake is cooling, whip the heavy cream and powdered sugar together until soft peaks form.
  7. Once the cake is completely cool, spread the whipped cream over the top and garnish with chocolate shavings if desired.
  8. Slice, serve, and enjoy the creamy goodness!

Pro Tips for Making the Recipe

Here are some of my favorite tips to ensure your Bolo Mousse de Chocolate com Canela turns out perfectly:

  • Make sure your ingredients are at room temperature for better mixing.
  • Don’t overmix the batter; it should be just combined.
  • For an extra kick, add a pinch of cayenne pepper to the batter for a subtle heat.
  • Let the cake cool completely before adding the whipped cream to prevent it from melting.
  • Feel free to experiment with different toppings like fresh berries or a drizzle of caramel sauce.

How to Serve

This cake is incredibly versatile! Here are some serving suggestions:

  • Pair it with a scoop of vanilla ice cream for a delightful contrast.
  • Serve it alongside a cup of freshly brewed coffee or tea.
  • For a festive touch, add a sprinkle of cinnamon on top of the whipped cream.
  • It’s also delicious with a dollop of crème fraîche for a tangy twist.

Make Ahead and Storage

If you’re planning for a busy week, this cake is perfect for making ahead! Here’s how to store it:

  • Store the cake in an airtight container in the refrigerator for up to 3 days.
  • If you want to make it even earlier, you can freeze the cake (without the whipped cream) for up to 2 months. Just thaw it in the fridge overnight before serving.
  • For best results, add the whipped cream just before serving to keep it fresh and fluffy.

So there you have it! A deliciously creamy and elegant Bolo Mousse de Chocolate com Canela that’s sure to become a family favorite. Whether you’re looking for quick family dinners or simply want to indulge in a sweet treat, this cake is the answer. And if you’re in the mood for something savory, don’t forget to check out my collection of easy pasta recipes for more delightful weeknight dinner ideas. Happy baking!

Bolo Mousse de Chocolate com Canela – Cremoso e Sofisticado

Prep Time 30 minutes
Cook Time 25 minutes
Total Time 55 minutes
Servings 8 pieces
Calories 450
A rich and creamy chocolate and cinnamon cake with a luscious mousse topping, perfect for sophisticated desserts.

Ingredients

Bolo

  • 200 g chocolate meio amargo picado (Para o Bolo)
  • 100 g manteiga sem sal (Para o Bolo)
  • 3 units ovos (Para o Bolo)
  • 1 cup açúcar (Para o Bolo)
  • 1 cup farinha de trigo (Para o Bolo)
  • 1 teaspoon fermento em pó (Para o Bolo)
  • 1 teaspoon canela em pó (Para o Bolo)
  • 300 g chocolate meio amargo (Para a Mousse)
  • 3 units ovos (claras e gemas separadas) (Para a Mousse)
  • 3 tablespoons açúcar (Para a Mousse)
  • 1 pinch sal (Para a Mousse)
  • 1 teaspoon canela em pó (Para a Mousse)
  • 1 cup creme de leite fresco (Para a Mousse)

Instructions 

  • Modo de Preparar
  • Prépare o Bolo
  • Asse o bolo a 180°C por 25 minutos.
  • Derreta o chocolate com manteiga em banho-maria até ficar liso.
  • Bata as claras em neve com açúcar até obter picos firmes.
  • Incorpore o chocolate derretido às claras em neve delicadamente.
  • Recheie o bolo com a mousse de chocolate e canela.
  • Decore com raspas de chocolate e canela em pó.
  • Deixe gelar por pelo menos 2 horas antes de servir.

Notes

Para um sabor mais intenso, use chocolate amargo de alta qualidade.
Calories: 450kcal
Cost: $15
Course: Dessert
Cuisine: Brazilian
Keyword: chocolate, cinnamon

Oh, my goodness! If you’re looking for a dessert that’s as delightful as it is easy to make, you’ve come to the right place! Today, I’m excited to share my recipe for Sobremesa de Ninho com Chocolate – a creamy, dreamy treat that will have your family begging for seconds. This dessert is perfect for those busy weeknights when you want something sweet but don’t have hours to spend in the kitchen. Plus, it pairs beautifully with quick family dinners or even a cozy movie night. Let’s dive into this deliciousness!

Why You’ll Love This Recipe

  • It’s incredibly easy to make, perfect for busy weeknights.
  • Rich and creamy flavor that satisfies your sweet tooth.
  • Uses simple ingredients you probably already have at home.
  • Great for family gatherings or a special treat for yourself.
  • Can be made ahead of time, making it a fantastic option for entertaining.

Ingredients

To whip up this delightful Sobremesa de Ninho com Chocolate, you’ll need the following ingredients:

  • 1 cup of Ninho milk powder
  • 1 cup of heavy cream
  • 1/2 cup of sweetened condensed milk
  • 1/2 cup of chocolate syrup
  • 1 teaspoon of vanilla extract
  • Chocolate shavings or sprinkles for garnish

Full ingredient list with measurements is provided in the printable recipe card below.

How to Make the Recipe

Now, let’s get to the fun part – making this scrumptious dessert!

  1. In a mixing bowl, combine the Ninho milk powder, heavy cream, sweetened condensed milk, and vanilla extract. Whisk until smooth and creamy.
  2. Drizzle in the chocolate syrup and gently fold it into the mixture, creating a beautiful marbled effect.
  3. Pour the mixture into serving cups or a large dish, and refrigerate for at least 2 hours to set.
  4. Before serving, top with chocolate shavings or sprinkles for that extra touch of sweetness!

Pro Tips for Making the Recipe

Here are some of my favorite tips to ensure your Sobremesa de Ninho com Chocolate turns out perfectly:

  • Make sure to whisk the mixture thoroughly to avoid any lumps from the Ninho milk powder.
  • For a richer flavor, let the dessert chill overnight. The flavors meld beautifully!
  • If you want to get creative, try adding a layer of crushed cookies or fruit between layers of the creamy mixture.
  • Don’t skip the chocolate shavings – they add a lovely texture and visual appeal!

How to Serve

This dessert is versatile and can be served in various ways. Here are some ideas:

  • Serve it in individual cups for a charming presentation at dinner parties.
  • Pair it with a slice of your favorite cake for a delightful dessert platter.
  • Enjoy it alongside a warm cup of coffee or tea for a cozy afternoon treat.
  • It’s also a fantastic addition to a dessert table at family gatherings or celebrations!

Make Ahead and Storage

One of the best things about this Sobremesa de Ninho com Chocolate is that it can be made ahead of time! Here’s how to store it:

  • Store any leftovers in an airtight container in the refrigerator for up to 3 days.
  • If you’re making it for a special occasion, prepare it a day in advance to save time on the day of your event.
  • For a fun twist, try freezing it in popsicle molds for a refreshing summer treat!

So there you have it! A simple yet indulgent dessert that’s sure to impress your family and friends. Whether you’re enjoying it after a quick family dinner or as a sweet treat on a busy weeknight, this Sobremesa de Ninho com Chocolate is bound to become a favorite in your home. Don’t forget to check out my other easy pasta recipes for those nights when you need quick and delicious 30-minute meals. Happy cooking!

Sobremesa de Ninho com Chocolate – Fácil e Irresistível

Prep Time 20 minutes
Cook Time 30 minutes
Total Time 50 minutes
Servings 8 pieces
Calories 250
Delicie-se com esta sobremesa fácil de fazer, combinando o sabor do leite em pó Ninho com chocolate, perfeita para qualquer ocasião.

Ingredients

Group 1

  • 1 lata leite condensado
  • 2 sopa manteiga
  • 200 g leite em pó Ninho
  • 200 g chocolate meio amargo derretido (para cobertura)
  • Chocolate granulado opcional para decorar

Instructions 

  • Modo de Preparo
  • Em uma panela, coloque o leite condensado, a manteiga e o leite em pó. Misture bem até formar um creme liso.
  • Leve ao fogo baixo, mexendo sempre, até obter uma massa consistente e desgrudar do fundo da panela (cerca de 7 dias na geladeira).
  • Despeje a massa em uma assadeira forrada com papel manteiga, espalhe e deixe esfriar.
  • Corte em quadrados ou a seu gosto.
  • Derreta o chocolate meio amargo e cubra cada pedaço, decorando com granulado se desejar.
  • Deixe as sobremesas na geladeira por 30 minutos para firmar.

Notes

Use chocolate de boa qualidade para um sabor mais intenso.
Calories: 250kcal
Cost: $15
Course: Dessert
Cuisine: Brazilian
Keyword: chocolate, leite em pó, sobremesa

Oh, my goodness! If you’re looking for a dish that will impress your family and friends while being incredibly easy to make, you’ve come to the right place! Today, I’m excited to share my recipe for Lasanha de Bacalhau Irresistível – a creamy and sophisticated dish that’s perfect for quick family dinners. This is one of those easy pasta recipes that will have everyone asking for seconds!

Why You’ll Love This Recipe

  • It’s a unique twist on traditional lasagna that features the delightful flavors of cod.
  • Perfect for weeknight dinner ideas when you want something special without spending hours in the kitchen.
  • This dish is creamy, comforting, and sure to please even the pickiest eaters.
  • It can be made in just 30 minutes, making it an ideal choice for 30-minute meals.
  • Leftovers are just as delicious, making it great for meal prep!

Ingredients

To create this mouthwatering Lasanha de Bacalhau Irresistível, you’ll need the following ingredients:

  • 1 pound of salted cod (bacalhau), soaked and shredded
  • 9 lasagna noodles
  • 2 cups of ricotta cheese
  • 1 cup of heavy cream
  • 1 cup of grated Parmesan cheese
  • 2 cups of spinach, fresh or frozen
  • 4 cloves of garlic, minced
  • 1 onion, chopped
  • 2 tablespoons of olive oil
  • Salt and pepper to taste
  • Fresh parsley for garnish

Full ingredient list with measurements is provided in the printable recipe card below.

How to Make the Recipe

Now, let’s dive into the steps to create this delicious dish:

  1. Preheat your oven to 375°F (190°C).
  2. In a large pot, bring salted water to a boil and cook the lasagna noodles according to package instructions. Drain and set aside.
  3. In a skillet, heat the olive oil over medium heat. Add the chopped onion and minced garlic, sautéing until fragrant and translucent.
  4. Add the shredded cod to the skillet and cook for about 5 minutes, stirring occasionally.
  5. Stir in the spinach and cook until wilted. Season with salt and pepper to taste.
  6. In a bowl, mix the ricotta cheese, heavy cream, and half of the Parmesan cheese until well combined.
  7. In a baking dish, spread a thin layer of the ricotta mixture on the bottom. Layer three lasagna noodles on top, followed by half of the cod and spinach mixture. Repeat the layers, finishing with a layer of noodles and the remaining ricotta mixture on top.
  8. Sprinkle the remaining Parmesan cheese over the top layer.
  9. Bake in the preheated oven for 25-30 minutes, or until bubbly and golden brown.
  10. Let it cool for a few minutes before serving. Garnish with fresh parsley.

Pro Tips for Making the Recipe

Here are some of my favorite tips to ensure your Lasanha de Bacalhau Irresistível turns out perfectly:

  • Make sure to soak the cod for at least 24 hours to remove excess salt.
  • Feel free to add other vegetables like zucchini or bell peppers for extra flavor and nutrition.
  • If you want a bit of a kick, add some red pepper flakes to the garlic and onion mixture.
  • For a creamier texture, you can add more heavy cream to the ricotta mixture.
  • This dish can be assembled ahead of time and stored in the fridge until you’re ready to bake it!

How to Serve

This Lasanha de Bacalhau Irresistível is best served warm, straight from the oven. Pair it with a simple green salad and a glass of white wine for a delightful meal. You can also serve it with a side of creamy garlic pasta for an extra touch of indulgence!

Make Ahead and Storage

If you’re like me and love to plan ahead, this lasagna is perfect for meal prep! You can assemble it a day in advance and keep it in the refrigerator until you’re ready to bake. Just remember to cover it tightly with foil to prevent it from drying out. Leftovers can be stored in an airtight container in the fridge for up to 3 days. Reheat in the oven or microwave until warmed through.

So there you have it! A delicious, creamy, and elegant Lasanha de Bacalhau Irresistível that’s perfect for any occasion. I hope you enjoy making this dish as much as I do. It’s sure to become a favorite in your home, especially for those busy weeknights when you need quick family dinners that don’t skimp on flavor. Happy cooking!

Lasanha de Bacalhau Irresistível – Cremosa e Sofisticada

Prep Time 30 minutes
Cook Time 45 minutes
Total Time 1 hour 15 minutes
Servings 8 pieces
Calories 450
Uma lasanha sofisticada com bacalhau desfiado, cremosa e cheia de sabores intensos, perfeita para impressionar na refeição.

Ingredients

Main ingredients

  • 500 g de bacalhau dessalgado
  • 1 piece cebola picada
  • 2 dentes de alho picados
  • a gosto Azeite de oliva
  • 500 ml de leite integral
  • 50 g de manteiga
  • 50 g de farinha de trigo
  • a gosto Noz-moscada ralada
  • a gosto Sal e pimenta-do-reino
  • 1 pacote de massa para lasanha (pré-cozida ou fresca)
  • 200 g de queijo mussarela ralado
  • 100 g de queijo parmesão ralado

Instructions 

  • Modo de preparar: Desfie o bacalhau e reserve.
  • Refogue a cebola e o alho no azeite até ficarem dourados.
  • Prepare o molho branco: derreta a manteiga, adicione a farinha e mexa até formar um roux. Acrescente o leite aos poucos, mexendo sempre, até engrossar. Tempere com noz-moscada, sal e pimenta.
  • Junte o bacalhau desfiado ao molho e misture bem.
  • Monte a lasanha: em uma travessa, coloque uma camada de molho de bacalhau, cubra com massa, repita as camadas e finalize com queijo mussarela e parmesão.
  • Asse em forno pré-aquecido a 180°C por aproximadamente 30 minutos ou até dourar.
  • Deixe descansar por 10 minutos antes de servir.

Notes

Para uma versão mais leve, substitua o leite integral por leite desnatado e reduza o queijo.
Calories: 450kcal
Cost: $15
Course: Main Course
Cuisine: Brazilian
Keyword: bacalhau

There’s something truly magical about baking a cake, especially when it comes to the rich, velvety goodness of a Bolo Veludo Red Velvet. This cake is not just a treat for the taste buds; it’s a feast for the eyes too! As I whisk together the ingredients, I can already imagine the smiles on my family’s faces when they take that first bite. If you’re looking for a delightful dessert that will impress your guests or simply want to indulge in something sweet, this recipe is for you! Plus, it’s a fantastic way to break up the week when you’re busy with quick family dinners or even after a long day of preparing easy pasta recipes. Let’s dive into this delicious adventure!

Why You’ll Love This Recipe

  • It’s incredibly soft and creamy, making it a perfect dessert for any occasion.
  • Simple ingredients that you probably already have in your pantry.
  • Perfect for celebrations or just a cozy weeknight dinner idea.
  • Impressive enough to serve at gatherings, yet easy enough for a casual family night.
  • It pairs beautifully with a variety of frostings, especially cream cheese!

Ingredients

To create this luscious Bolo Veludo Red Velvet, you’ll need the following ingredients:

  • 2 ½ cups all-purpose flour
  • 1 ½ cups granulated sugar
  • 1 cup vegetable oil
  • 1 cup buttermilk, room temperature
  • 2 large eggs, room temperature
  • 2 tablespoons cocoa powder
  • 1 teaspoon baking soda
  • 1 teaspoon vanilla extract
  • 1 teaspoon white vinegar
  • Red food coloring (about 2 tablespoons)

Full ingredient list with measurements is provided in the printable recipe card below.

How to Make the Recipe

Now, let’s get to the fun part—baking this beautiful cake!

  1. Preheat your oven to 350°F (175°C) and grease two 9-inch round cake pans.
  2. In a large mixing bowl, combine the flour, sugar, cocoa powder, baking soda, and salt. Whisk until well blended.
  3. In another bowl, mix the vegetable oil, buttermilk, eggs, vanilla extract, and vinegar. Add the red food coloring and stir until combined.
  4. Gradually add the wet ingredients to the dry ingredients, mixing until just combined. Be careful not to overmix!
  5. Divide the batter evenly between the prepared cake pans.
  6. Bake for 25-30 minutes, or until a toothpick inserted in the center comes out clean.
  7. Allow the cakes to cool in the pans for 10 minutes, then transfer to wire racks to cool completely.

Pro Tips for Making the Recipe

Here are some of my favorite tips to ensure your Bolo Veludo Red Velvet turns out perfectly:

  • Make sure all your ingredients are at room temperature for a smoother batter.
  • Don’t skip the vinegar; it reacts with the baking soda to create a fluffy texture.
  • For an extra moist cake, you can brush the layers with a simple syrup after baking.
  • Feel free to adjust the amount of red food coloring to achieve your desired shade.
  • Let the cake cool completely before frosting to prevent melting.

How to Serve

This cake is delightful on its own, but you can elevate it even further! Here are some serving suggestions:

  • Top with a generous layer of cream cheese frosting for that classic pairing.
  • Serve with a scoop of vanilla ice cream for a delightful contrast.
  • Garnish with fresh berries or chocolate shavings for a touch of elegance.
  • Pair it with a cup of coffee or tea for a cozy afternoon treat.

Make Ahead and Storage

If you want to prepare this cake in advance, here are some tips:

  • The baked cake layers can be wrapped tightly in plastic wrap and stored in the refrigerator for up to 3 days.
  • You can also freeze the layers for up to 2 months. Just make sure to wrap them well!
  • Frost the cake just before serving for the best texture and flavor.
  • Leftover cake can be stored in an airtight container at room temperature for up to 3 days.

Now that you have all the tips and tricks, I hope you feel inspired to bake this Bolo Veludo Red Velvet! It’s a wonderful addition to your collection of weeknight dinner ideas and a perfect way to treat your family after a busy day filled with 30-minute meals or creamy garlic pasta. Enjoy every bite, and don’t forget to share your delicious creations with friends and family!

Bolo-Veludo (Red Velvet) – Macio e Cremoso

Prep Time 30 minutes
Cook Time 40 minutes
Total Time 1 hour 10 minutes
Servings 12 slices
Calories 350
A moist and creamy red velvet cake with a luscious cream cheese frosting, perfect for special occasions.

Ingredients

Bolo

  • 2.5 cups farinha de trigo
  • 1.5 cups açúcar
  • 1 tsp bicarbonato de sódio
  • 1 tsp sal
  • 1 tbsp cacau em pó
  • 1.5 cups óleo vegetal
  • 1 cup buttermilk (leitelho)
  • 2 large ovos
  • 1 tbsp corante vermelho
  • 1 tsp vinagre branco
  • 1 tsp extrato de baunilha

Cobertura

  • 200 g cream cheese em temperatura ambiente
  • 0.5 cup manteiga em temperatura ambiente
  • 4 cups açúcar de confeiteiro
  • 1 tsp extrato de baunilha

Instructions 

  • Modo de preparar

Notes

Deixe esfriar antes de desenformar.
Calories: 350kcal
Cost: $15
Course: Dessert
Cuisine: Brazilian
Keyword: red velvet

Oh, my goodness! If you’re looking for a delightful treat that will make your taste buds dance, you’ve come to the right place! Today, I’m excited to share my recipe for Churros dos Sonhos Crocante e Recheado, which translates to “Crispy and Filled Dream Churros.” These churros are not only crispy on the outside but also filled with sweet goodness that will have you coming back for more. And let me tell you, they are the perfect addition to your quick family dinners or even as a sweet treat after one of those easy pasta recipes you whip up during the week. So, let’s dive in!

Why You’ll Love This Recipe

  • Perfectly crispy exterior that gives way to a delicious filling.
  • Easy to make at home, so you can impress your family and friends.
  • Great for any occasion, from casual weeknight dinners to festive gatherings.
  • Customizable fillings to suit everyone’s taste!
  • Pairs wonderfully with coffee or hot chocolate for a cozy treat.

Ingredients

To make these scrumptious churros, you’ll need the following ingredients:

  • 1 cup water
  • 1/2 cup unsalted butter
  • 1 cup all-purpose flour
  • 1/4 teaspoon salt
  • 1 teaspoon sugar
  • 3 large eggs
  • Vegetable oil for frying
  • 1 cup sugar (for coating)
  • 1 tablespoon cinnamon (for coating)
  • Your choice of filling (chocolate, dulce de leche, or cream)

Full ingredient list with measurements is provided in the printable recipe card below.

How to Make the Recipe

Now, let’s get to the fun part—making these churros!

  1. In a medium saucepan, combine the water, butter, salt, and sugar. Bring to a boil over medium heat.
  2. Once boiling, remove from heat and stir in the flour until a dough forms.
  3. Let the dough cool for about 10 minutes, then add the eggs one at a time, mixing well after each addition.
  4. Transfer the dough to a piping bag fitted with a star tip.
  5. In a deep skillet, heat the vegetable oil to 350°F (175°C).
  6. Pipe 4-6 inch strips of dough into the hot oil, frying until golden brown on all sides. This should take about 2-3 minutes.
  7. Remove the churros and drain on paper towels.
  8. Mix the sugar and cinnamon in a bowl and roll the churros in this mixture while they are still warm.
  9. Fill each churro with your choice of filling using a piping bag.
  10. Serve warm and enjoy!

Pro Tips for Making the Recipe

Here are some of my favorite tips to ensure your churros turn out perfectly every time:

  • Make sure your oil is hot enough before frying; otherwise, the churros will absorb too much oil and become greasy.
  • Don’t overcrowd the pan while frying; this can lower the oil temperature and lead to soggy churros.
  • Experiment with different fillings! You can even try savory options for a unique twist.
  • For a fun presentation, dust with powdered sugar or drizzle with chocolate sauce.

How to Serve

These churros are best served warm, straight from the fryer. Pair them with a cup of coffee or hot chocolate for a delightful treat. You can also serve them at parties or family gatherings as a fun dessert option. They’re sure to be a hit!

Make Ahead and Storage

If you want to prepare these churros ahead of time, you can make the dough and store it in the refrigerator for up to 24 hours. Just remember to bring it back to room temperature before frying. If you have leftovers (which is rare!), store them in an airtight container at room temperature for up to 2 days. Reheat them in the oven for a few minutes to regain their crispiness.

So there you have it! A delicious recipe for Churros dos Sonhos Crocante e Recheado that’s perfect for any occasion. Whether you’re looking for a sweet treat after one of your 30-minute meals or a fun dessert for a gathering, these churros will not disappoint. Enjoy making them, and don’t forget to share your creations with friends and family!

Churros dos Sonhos – Crocante e Recheado

Prep Time 15 minutes
Cook Time 20 minutes
Total Time 35 minutes
Servings 8 pieces
Calories 250
Delight in these crispy, filled churros, perfect for sharing and indulging in a sweet treat.

Ingredients

Dough

  • 1 cup water
  • 0.5 cup butter
  • 0.25 teaspoon salt
  • 1 cup flour
  • 3 eggs eggs
  • to taste sugar sugar
  • to taste cinnamon cinnamon powder
  • as needed filling doce de leite, chocolate, Nutella or jams

Instructions 

  • In a saucepan, combine water, butter, and salt. Bring to a boil.
  • Add flour gradually, stirring until a dough forms and pulls away from the sides.
  • Remove from heat and let cool slightly. Mix in eggs one at a time until smooth.
  • Pipe the dough into hot oil and fry until golden and crispy.
  • Drain on paper towels. Fill with your preferred sweet filling and coat with sugar and cinnamon.

Notes

Serve warm for the best experience.
Calories: 250kcal
Cost: $15
Course: Dessert
Cuisine: Brazilian
Keyword: churros

There’s something truly magical about baking a cake that fills your home with warmth and delightful aromas. Today, I’m excited to share with you my favorite recipe for Bolo Formigueiro de Cenoura – Fofinho e Irresistível, a fluffy and tasty carrot cake that’s studded with chocolate granulado. This cake is not only a treat for the taste buds but also a wonderful way to bring the family together. And if you’re looking for easy pasta recipes to complement your weeknight dinners, you’re in for a treat! Let’s dive into this delicious recipe that’s sure to become a family favorite.

Why You’ll Love This Recipe

  • It’s incredibly fluffy and moist, making it a perfect dessert for any occasion.
  • Simple ingredients that you probably already have in your pantry.
  • Quick to prepare, so you can whip it up even on busy weeknights.
  • Perfect for family gatherings or as a sweet treat after quick family dinners.
  • Kids and adults alike will love the chocolatey surprise in every bite!

Ingredients

To make this delightful carrot cake, you’ll need the following ingredients:

  • 2 cups grated carrots
  • 1 cup sugar
  • 1 cup vegetable oil
  • 4 large eggs
  • 2 cups all-purpose flour
  • 1 tablespoon baking powder
  • 1 teaspoon vanilla extract
  • 1 cup chocolate granulado (chocolate sprinkles)

Full ingredient list with measurements is provided in the printable recipe card below.

How to Make the Recipe

Now, let’s get to the fun part—making the cake!

  1. Preheat your oven to 350°F (175°C) and grease a 9-inch round cake pan.
  2. In a large mixing bowl, combine the grated carrots, sugar, and vegetable oil. Mix well until combined.
  3. Add the eggs one at a time, mixing well after each addition.
  4. In a separate bowl, whisk together the flour, baking powder, and vanilla extract.
  5. Gradually add the dry ingredients to the wet mixture, stirring until just combined.
  6. Fold in the chocolate granulado, ensuring they are evenly distributed throughout the batter.
  7. Pour the batter into the prepared cake pan and smooth the top with a spatula.
  8. Bake for 30-35 minutes or until a toothpick inserted into the center comes out clean.
  9. Allow the cake to cool in the pan for 10 minutes before transferring it to a wire rack to cool completely.

Pro Tips for Making the Recipe

Here are some helpful suggestions to ensure your cake turns out perfectly:

  • Make sure to grate the carrots finely for a smoother texture.
  • For an extra touch, you can add a cream cheese frosting on top!
  • Don’t overmix the batter; mix just until combined to keep the cake fluffy.
  • If you want to make this cake ahead of time, it freezes beautifully!

How to Serve

This cake is delightful on its own, but here are some serving suggestions:

  • Serve it warm with a scoop of vanilla ice cream for a comforting dessert.
  • Pair it with a cup of coffee or tea for a lovely afternoon treat.
  • Top with whipped cream and fresh berries for a refreshing twist.

Make Ahead and Storage

If you’re planning to make this cake ahead of time, here are some tips:

  • Store the cooled cake in an airtight container at room temperature for up to 3 days.
  • For longer storage, wrap the cake tightly in plastic wrap and freeze for up to 3 months.
  • Thaw the cake in the refrigerator overnight before serving.

Now that you have this delightful recipe in your arsenal, you can easily impress your family and friends with your baking skills! And if you’re looking for more 30-minute meals or weeknight dinner ideas, don’t forget to check out my collection of creamy garlic pasta recipes that are perfect for busy nights. Happy baking!

Bolo Formigueiro de Cenoura – Fofinho e Irresistível

Prep Time 20 minutes
Cook Time 40 minutes
Total Time 1 hour
Servings 8 slices
Calories 350
Delight in this moist, carrot-based cake with a crunchy chocolate topping, perfect for any occasion.

Ingredients

Main

  • 3 medium carrots, peeled and chopped
  • 4 eggs eggs
  • 1 cup sunflower or canola oil
  • 2 cups sugar
  • 2.5 cups all-purpose flour
  • 1 tbsp baking powder
  • 1 cup chocolate sprinkles
  • 1 can sweetened condensed milk (For the topping)
  • 1 tbsp butter (For the topping)
  • 3 tbsp cocoa powder (For the topping)
  • 0.5 cup milk (For the topping)

Instructions 

  • Preheat oven to 180°C (356°F). Grease and flour a baking pan.
  • In a blender, blend carrots, eggs, and oil until smooth.
  • In a bowl, combine flour, sugar, and baking powder. Add the blended mixture and mix well.
  • Pour batter into the prepared pan and bake for 40 minutes or until a toothpick inserted comes out clean.
  • Prepare the topping: in a saucepan, combine condensed milk, butter, cocoa powder, and milk. Cook over medium heat, stirring constantly, until thickened.
  • Spread the topping over the cooled cake and sprinkle with chocolate sprinkles.

Notes

Keep the cake refrigerated for best results. Enjoy!
Calories: 350kcal
Cost: $15
Course: Dessert
Cuisine: Brazilian
Keyword: carrot

Oh, the joy of making homemade ice cream! If you’re like me and have a soft spot for creamy desserts, then you’re in for a treat with this Gelado de Coco Cremoso e Fácil. This delightful coconut ice cream is not only easy to whip up but also incredibly satisfying. With just a few simple ingredients, you can create a dessert that will have your family and friends begging for seconds. Plus, it’s a fantastic way to cool down on a hot day! And let’s be honest, who doesn’t love a sweet treat that feels like a mini-vacation? So, let’s dive into this delicious recipe!

Why You’ll Love This Recipe

  • It’s incredibly easy to make, perfect for busy weeknights.
  • Only requires a handful of ingredients you probably already have at home.
  • It’s a creamy, dreamy dessert that satisfies your sweet tooth.
  • Great for family gatherings or a cozy night in.
  • Can be made ahead of time, making it a perfect addition to your quick family dinners.

Ingredients

To make this Gelado de Coco Cremoso e Fácil, you’ll need the following ingredients:

  • 2 cups of coconut milk
  • 1 cup of heavy cream
  • 3/4 cup of sugar
  • 1 teaspoon of vanilla extract
  • 1/2 cup of shredded coconut (optional, for extra texture)

Full ingredient list with measurements is provided in the printable recipe card below.

How to Make the Recipe

Now, let’s get to the fun part—making our delicious coconut ice cream!

  1. In a mixing bowl, combine the coconut milk, heavy cream, sugar, and vanilla extract. Whisk until the sugar is fully dissolved.
  2. If you’re using shredded coconut, fold it into the mixture for added texture.
  3. Pour the mixture into an ice cream maker and churn according to the manufacturer’s instructions. This usually takes about 20-25 minutes.
  4. Once the ice cream reaches a soft-serve consistency, transfer it to an airtight container.
  5. Freeze for at least 4 hours or until firm.

Pro Tips for Making the Recipe

Here are some helpful suggestions to ensure your Gelado de Coco Cremoso e Fácil turns out perfectly:

  • Make sure your ice cream maker is fully chilled before starting.
  • For a richer flavor, use full-fat coconut milk.
  • Let the ice cream sit at room temperature for a few minutes before scooping for easier serving.
  • Experiment with mix-ins like chocolate chips or nuts for a fun twist!

How to Serve

This creamy coconut ice cream is perfect on its own, but you can elevate it even further! Here are some serving suggestions:

  • Serve it in a waffle cone for a classic treat.
  • Top with fresh fruit like mango or pineapple for a tropical flair.
  • Drizzle with chocolate or caramel sauce for an indulgent dessert.
  • Pair it with your favorite easy pasta recipes for a delightful meal followed by a sweet finish.

Make Ahead and Storage

This Gelado de Coco Cremoso e Fácil is perfect for making ahead of time. Here’s how to store it:

  • Store the ice cream in an airtight container in the freezer for up to 2 weeks.
  • If it becomes too hard, let it sit at room temperature for a few minutes before scooping.
  • For a quick family dinner, make this ice cream a day in advance so it’s ready to serve after your meal.

And there you have it! A delightful, creamy coconut ice cream that’s not only easy to make but also a fantastic way to treat yourself and your loved ones. Whether you’re enjoying it on a hot summer day or as a sweet ending to your weeknight dinner ideas, this Gelado de Coco Cremoso e Fácil is sure to impress. So, gather your ingredients and get ready to indulge in this delicious treat today!

Gelado de Coco Cremoso e Fácil

Prep Time 15 minutes
Total Time 15 minutes
Servings 8 servings
Calories 350
A delicious and easy-to-make coconut ice cream that combines creamy textures with the tropical flavor of coconut, perfect for a refreshing treat.

Ingredients

Coconut Ice Cream

  • 1 can leite condensado
  • 1 can creme de leite
  • 200 ml leite de coco
  • 100 g coco ralado (preferencialmente fresco, mas pode ser seco)
  • 1 cup leite integral
  • 2 tablespoons açúcar
  • 1 teaspoon essência de baunilha (opcional)
  • Coco queimado ou raspas de coco para decorar decorar

Instructions 

  • Modo de preparo: Misture açúcar e essência de baunilha.
  • Em um panela, coloque o leite condensado, creme de leite, leite de coco, coco ralado, leite integral, açúcar e essência de baunilha. Leve ao fogo médio, mexendo até dissolver o coco e obter uma mistura homogênea. Quando ferver, desligue e deixe esfriar.
  • Despeje em um recipiente e leve ao congelador por 4 horas, mexendo a cada 30 minutos para evitar cristais de gelo.
  • Depois de congelado, decore com coco queimado ou raspas de coco e sirva.

Notes

Para uma textura mais cremosa, bata o sorvete no processador antes de servir.
Calories: 350kcal
Cost: $15
Course: Dessert
Cuisine: Brazilian
Keyword: coconut