Author

thomas

Browsing

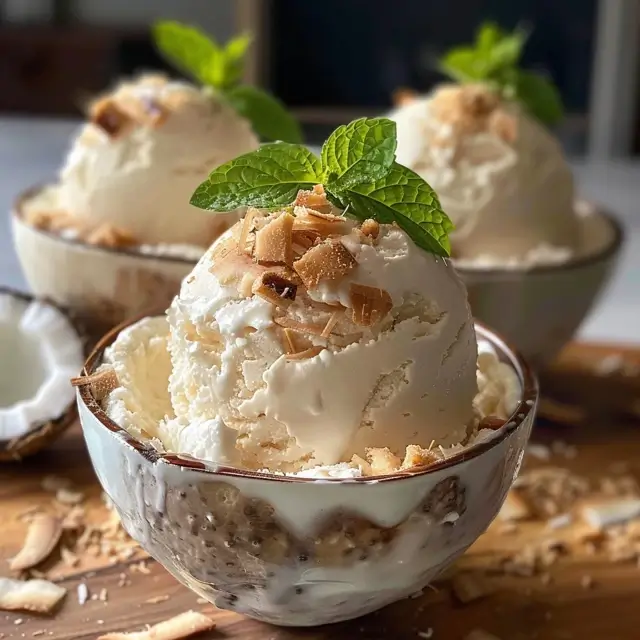
Oh, the joy of making homemade ice cream! If you’re like me and have a soft spot for creamy desserts, then you’re in for a treat with this Gelado de Coco Cremoso e Fácil. This delightful coconut ice cream is not only easy to whip up but also incredibly satisfying. With just a few simple ingredients, you can create a dessert that will have your family and friends begging for seconds. Plus, it’s a fantastic way to cool down on a hot day! And let’s be honest, who doesn’t love a sweet treat that feels like a mini-vacation? So, let’s dive into this delicious recipe!

Why You’ll Love This Recipe

  • It’s incredibly easy to make, perfect for busy weeknights.
  • Only requires a handful of ingredients you probably already have at home.
  • It’s a creamy, dreamy dessert that satisfies your sweet tooth.
  • Great for family gatherings or a cozy night in.
  • Can be made ahead of time, making it a perfect addition to your quick family dinners.

Ingredients

To make this Gelado de Coco Cremoso e Fácil, you’ll need the following ingredients:

  • 2 cups of coconut milk
  • 1 cup of heavy cream
  • 3/4 cup of sugar
  • 1 teaspoon of vanilla extract
  • 1/2 cup of shredded coconut (optional, for extra texture)

Full ingredient list with measurements is provided in the printable recipe card below.

How to Make the Recipe

Now, let’s get to the fun part—making our delicious coconut ice cream!

  1. In a mixing bowl, combine the coconut milk, heavy cream, sugar, and vanilla extract. Whisk until the sugar is fully dissolved.
  2. If you’re using shredded coconut, fold it into the mixture for added texture.
  3. Pour the mixture into an ice cream maker and churn according to the manufacturer’s instructions. This usually takes about 20-25 minutes.
  4. Once the ice cream reaches a soft-serve consistency, transfer it to an airtight container.
  5. Freeze for at least 4 hours or until firm.

Pro Tips for Making the Recipe

Here are some helpful suggestions to ensure your Gelado de Coco Cremoso e Fácil turns out perfectly:

  • Make sure your ice cream maker is fully chilled before starting.
  • For a richer flavor, use full-fat coconut milk.
  • Let the ice cream sit at room temperature for a few minutes before scooping for easier serving.
  • Experiment with mix-ins like chocolate chips or nuts for a fun twist!

How to Serve

This creamy coconut ice cream is perfect on its own, but you can elevate it even further! Here are some serving suggestions:

  • Serve it in a waffle cone for a classic treat.
  • Top with fresh fruit like mango or pineapple for a tropical flair.
  • Drizzle with chocolate or caramel sauce for an indulgent dessert.
  • Pair it with your favorite easy pasta recipes for a delightful meal followed by a sweet finish.

Make Ahead and Storage

This Gelado de Coco Cremoso e Fácil is perfect for making ahead of time. Here’s how to store it:

  • Store the ice cream in an airtight container in the freezer for up to 2 weeks.
  • If it becomes too hard, let it sit at room temperature for a few minutes before scooping.
  • For a quick family dinner, make this ice cream a day in advance so it’s ready to serve after your meal.

And there you have it! A delightful, creamy coconut ice cream that’s not only easy to make but also a fantastic way to treat yourself and your loved ones. Whether you’re enjoying it on a hot summer day or as a sweet ending to your weeknight dinner ideas, this Gelado de Coco Cremoso e Fácil is sure to impress. So, gather your ingredients and get ready to indulge in this delicious treat today!

Gelado de Coco Cremoso e Fácil

Prep Time 15 minutes
Total Time 15 minutes
Servings 8 servings
Calories 350
A delicious and easy-to-make coconut ice cream that combines creamy textures with the tropical flavor of coconut, perfect for a refreshing treat.

Ingredients

Coconut Ice Cream

  • 1 can leite condensado
  • 1 can creme de leite
  • 200 ml leite de coco
  • 100 g coco ralado (preferencialmente fresco, mas pode ser seco)
  • 1 cup leite integral
  • 2 tablespoons açúcar
  • 1 teaspoon essência de baunilha (opcional)
  • Coco queimado ou raspas de coco para decorar decorar

Instructions 

  • Modo de preparo: Misture açúcar e essência de baunilha.
  • Em um panela, coloque o leite condensado, creme de leite, leite de coco, coco ralado, leite integral, açúcar e essência de baunilha. Leve ao fogo médio, mexendo até dissolver o coco e obter uma mistura homogênea. Quando ferver, desligue e deixe esfriar.
  • Despeje em um recipiente e leve ao congelador por 4 horas, mexendo a cada 30 minutos para evitar cristais de gelo.
  • Depois de congelado, decore com coco queimado ou raspas de coco e sirva.

Notes

Para uma textura mais cremosa, bata o sorvete no processador antes de servir.
Calories: 350kcal
Cost: $15
Course: Dessert
Cuisine: Brazilian
Keyword: coconut

Oh, the joy of biting into a warm, fluffy donut! If you’re like me, you know that nothing beats the taste of homemade treats. Today, I’m excited to share my recipe for Rosquinha Simples Caseira e Fofinha, a delightful fried donut that’s perfect for any occasion. Whether you’re looking for a sweet breakfast or a delightful snack, these donuts will surely bring a smile to your face. Plus, they’re so easy to make that you can whip them up alongside your favorite easy pasta recipes for a quick family dinner!

Why You’ll Love This Recipe

  • Simple ingredients that you probably already have at home.
  • Perfectly fluffy texture that melts in your mouth.
  • Quick to prepare, making it ideal for 30-minute meals.
  • Great for sharing with family and friends.
  • Versatile enough to customize with your favorite toppings!

Ingredients

To make these delightful donuts, you’ll need the following ingredients:

  • 2 cups all-purpose flour
  • 1/2 cup sugar
  • 1 tablespoon baking powder
  • 1/2 teaspoon salt
  • 2 large eggs
  • 1/2 cup milk
  • 1 teaspoon vanilla extract
  • Vegetable oil for frying

Full ingredient list with measurements is provided in the printable recipe card below.

How to Make the Recipe

Now, let’s dive into the fun part—making these delicious donuts!

  1. In a large mixing bowl, combine the flour, sugar, baking powder, and salt. Mix well.
  2. In another bowl, whisk together the eggs, milk, and vanilla extract until smooth.
  3. Gradually add the wet ingredients to the dry ingredients, stirring until a soft dough forms.
  4. Turn the dough out onto a floured surface and knead gently for about 1-2 minutes until smooth.
  5. Roll the dough out to about 1/2 inch thick and cut out donut shapes using a donut cutter or two round cookie cutters.
  6. In a deep skillet, heat the vegetable oil over medium heat. Once hot, carefully add the donuts, frying them until golden brown on both sides (about 2-3 minutes per side).
  7. Remove the donuts from the oil and place them on paper towels to drain excess oil.
  8. Let them cool slightly before serving. You can dust them with powdered sugar or dip them in chocolate for an extra treat!

Pro Tips for Making the Recipe

Here are some of my favorite tips to ensure your donuts turn out perfectly every time:

  • Make sure your oil is hot enough before frying; otherwise, the donuts will absorb too much oil.
  • Don’t overcrowd the pan; fry in batches to maintain the oil temperature.
  • Experiment with different flavors by adding spices like cinnamon or nutmeg to the dough.
  • For a fun twist, try filling the donuts with jam or cream after frying!

How to Serve

These donuts are best enjoyed fresh, but they can also be served in various delightful ways:

  • Pair them with a cup of coffee or tea for a cozy afternoon treat.
  • Serve them at brunch alongside some creamy garlic pasta for a unique twist on your usual menu.
  • Offer a variety of toppings like sprinkles, chocolate glaze, or even a drizzle of caramel for a fun dessert option.

Make Ahead and Storage

If you want to prepare these donuts ahead of time, here are some tips:

  • Prepare the dough and cut out the donuts, then refrigerate them for up to 24 hours before frying.
  • Fried donuts can be stored in an airtight container at room temperature for up to 2 days.
  • For longer storage, freeze the unglazed donuts in a single layer, then transfer them to a freezer bag. They can be reheated in the oven when you’re ready to enjoy them!

So there you have it! A delightful recipe for Rosquinha Simples Caseira e Fofinha that’s sure to become a family favorite. Whether you’re looking for weeknight dinner ideas or a sweet treat to share, these donuts are the perfect choice. I can’t wait for you to try them!

Rosquinha Simples Caseira e Fofinha

Prep Time 15 minutes
Cook Time 10 minutes
Total Time 25 minutes
Servings 12 pieces
Calories 150
A delicious and easy-to-make Brazilian-style donut, perfect for a quick snack or breakfast.

Ingredients

Dough

  • 2 eggs ovos
  • 3 tablespoons açúcar
  • 2 tablespoons manteiga ou margarina
  • 1 pinch sal
  • 1 tablespoon fermento em pó
  • 0.5 cup leite
  • 4 cups farinha de trigo (aproximadamente)
  • Açúcar e canela para polvilhar (opcional)
  • Óleo for frying para fritar

Instructions 

  • Inicie a massa iniciando com a mistura inicial.
  • Hora da massa
  • Adicione o óleo, o fermento e misture bem.
  • Sovando
  • Modeando
  • Fritura perfeita
  • Passe no açúcar e o suficiente para as rosquinhas tradicionais.

Notes

Use óleo quente, e não esqueça de ajustar a farinha para obter uma massa macia que não grude nas mãos.
Calories: 150kcal
Cost: $15
Course: Dessert
Cuisine: Brazilian
Keyword: donut

Oh, my goodness! If you’re looking for a dessert that will make your taste buds dance, you’ve come to the right place! Today, I’m thrilled to share my recipe for Bolo de Coco Cremoso com Chocolate, a luscious coconut cake drizzled with rich chocolate. This delightful treat is perfect for any occasion, whether you’re hosting a family gathering or simply indulging yourself after a long day. And let me tell you, it’s as easy as pie—well, easier than pie! Plus, if you’re in the mood for some quick family dinners or easy pasta recipes, I’ve got you covered with those too!

Why You’ll Love This Recipe

  • It combines the tropical flavor of coconut with the decadence of chocolate.
  • Perfect for any occasion, from casual weeknight dinners to special celebrations.
  • Simple ingredients that you probably already have in your pantry.
  • It’s a crowd-pleaser that will impress your family and friends.
  • Can be made ahead of time, making it a great option for busy weeks.

Ingredients

To whip up this delightful Bolo de Coco Cremoso com Chocolate, you’ll need the following ingredients:

  • 1 cup of shredded coconut
  • 1 cup of all-purpose flour
  • 1 cup of sugar
  • 1/2 cup of unsweetened cocoa powder
  • 1/2 cup of butter, softened
  • 4 large eggs
  • 1 cup of milk
  • 1 tablespoon of baking powder
  • 1 teaspoon of vanilla extract
  • 1/2 teaspoon of salt

Full ingredient list with measurements is provided in the printable recipe card below.

How to Make the Recipe

Now, let’s get to the fun part—making this scrumptious cake! Follow these simple steps:

  1. Preheat your oven to 350°F (175°C) and grease a 9-inch round cake pan.
  2. In a large mixing bowl, cream together the softened butter and sugar until light and fluffy.
  3. Add the eggs one at a time, mixing well after each addition.
  4. Stir in the vanilla extract and milk until well combined.
  5. In another bowl, whisk together the flour, cocoa powder, baking powder, shredded coconut, and salt.
  6. Gradually add the dry ingredients to the wet mixture, stirring until just combined.
  7. Pour the batter into the prepared cake pan and smooth the top.
  8. Bake for 30-35 minutes, or until a toothpick inserted in the center comes out clean.
  9. Let the cake cool in the pan for 10 minutes before transferring it to a wire rack to cool completely.
  10. Once cooled, drizzle with melted chocolate or serve with a dollop of whipped cream for an extra treat!

Pro Tips for Making the Recipe

Here are some of my favorite tips to ensure your Bolo de Coco Cremoso com Chocolate turns out perfectly:

  • Make sure your butter is at room temperature for easier mixing.
  • For an extra coconut kick, toast the shredded coconut before adding it to the batter.
  • If you prefer a richer chocolate flavor, use dark cocoa powder.
  • Don’t skip the cooling step; it helps the cake set properly.
  • Feel free to add chocolate chips to the batter for an extra chocolatey surprise!

How to Serve

This cake is delicious on its own, but here are some serving suggestions to elevate your dessert:

  • Serve with a scoop of vanilla ice cream for a delightful contrast.
  • Top with fresh berries for a pop of color and flavor.
  • Drizzle with chocolate sauce or a sprinkle of powdered sugar for a fancy touch.
  • Pair it with a cup of coffee or tea for a cozy afternoon treat.

Make Ahead and Storage

If you’re planning ahead, this cake is perfect for making in advance! Here’s how to store it:

  • Once cooled, wrap the cake tightly in plastic wrap and store it in the refrigerator for up to 5 days.
  • You can also freeze the cake for up to 3 months. Just make sure to wrap it well to prevent freezer burn.
  • To serve, simply thaw in the refrigerator overnight and enjoy!

So there you have it! A delightful recipe for Bolo de Coco Cremoso com Chocolate that’s sure to impress. Whether you’re looking for a sweet treat after a busy week of quick family dinners or just want to indulge in something special, this cake is the answer. And if you’re ever in need of 30-minute meals or weeknight dinner ideas, don’t forget to check out my collection of easy pasta recipes like creamy garlic pasta that are perfect for those hectic nights. Happy baking!

Bolo de Coco Cremoso com Chocolate

Prep Time 30 minutes
Cook Time 35 minutes
Total Time 1 hour 5 minutes
Servings 12 slices
Calories 450
A decadent coconut and chocolate cake with creamy filling and rich ganache, perfect for special occasions.

Ingredients

Para a Massa

  • 3 eggs ovos
  • 1.5 cups açúcar
  • 2 cups farinha de trigo
  • 1 cup leite
  • 0.5 cup óleo
  • 1 sopa fermento em pó
  • 100 g coco ralado
  • 0.5 cup chocolate em pó ou cacau

Para a Cobertura

  • 1 lata leite condensado
  • 200 ml leite de coco
  • 100 g coco ralado
  • 1 sopa manteiga

Para a Ganache

  • 200 g chocolate meio amargo ou ao leite
  • 1 caixinha creme de leite (200 g)

Instructions 

  • Pré-aqueça o forno a 180°C e unte uma forma.
  • Bata os ovos com o açúcar até obter uma mistura clara.
  • Adicione a farinha, o leite, o óleo, o fermento, o coco ralado e o chocolate em pó, misturando delicadamente.
  • Asse por 35 minutos ou até o palito sair limpo.
  • Deixe o bolo esfriar e corte ao meio para rechear.
  • Preparo da cobertura: Misture o leite condensado, leite de coco, coco ralado e manteiga até obter uma mistura homogênea.
  • Recheie o bolo com a mistura de coco e cubra com a ganache de chocolate derretido, mexendo até ficar uniforme.
  • Leve à geladeira por 1 hora antes de servir.

Notes

Para um sabor mais intenso, utilize chocolate amargo na ganache.
Calories: 450kcal
Cost: $15
Course: Dessert
Cuisine: Brazilian
Keyword: cake, chocolate, coconut

Are you looking for a quick and delicious savory cake that will impress your family and friends? Well, you’re in for a treat! Today, I’m excited to share my recipe for Torta de Presunto e Queijo de Liquidificador, a delightful dish that you can whip up in just 30 minutes. This recipe is perfect for those busy weeknights when you want something satisfying without spending hours in the kitchen. Plus, it’s a fantastic addition to your repertoire of easy pasta recipes!

Why You’ll Love This Recipe

  • Quick and easy to prepare, making it perfect for 30-minute meals.
  • Uses simple ingredients that you probably already have in your pantry.
  • Deliciously savory, combining the flavors of ham and cheese.
  • Great for quick family dinners or as a snack for gatherings.
  • Can be served warm or cold, making it versatile for any occasion.

Ingredients

To make this scrumptious Torta de Presunto e Queijo de Liquidificador, you will need the following ingredients:

  • 1 cup of milk
  • 1 cup of vegetable oil
  • 3 large eggs
  • 2 cups of all-purpose flour
  • 1 tablespoon of baking powder
  • 1 cup of diced ham
  • 1 cup of shredded cheese (your choice!)
  • Salt and pepper to taste

Full ingredient list with measurements is provided in the printable recipe card below.

How to Make the Recipe

Now, let’s dive into the fun part—making this delicious torta!

  1. Preheat your oven to 350°F (175°C) and grease a baking dish.
  2. In a blender, combine the milk, vegetable oil, and eggs. Blend until smooth.
  3. In a separate bowl, mix the flour, baking powder, salt, and pepper.
  4. Gradually add the dry ingredients to the blender mixture, blending until well combined.
  5. Fold in the diced ham and shredded cheese gently with a spatula.
  6. Pour the batter into the greased baking dish and spread it evenly.
  7. Bake for 25-30 minutes or until the top is golden brown and a toothpick inserted in the center comes out clean.
  8. Let it cool for a few minutes before slicing and serving.

Pro Tips for Making the Recipe

Here are some helpful suggestions to ensure your Torta de Presunto e Queijo de Liquidificador turns out perfectly:

  • Feel free to experiment with different types of cheese for a unique flavor.
  • If you want to add some veggies, consider incorporating spinach or bell peppers.
  • Make sure not to overmix the batter; a few lumps are okay!
  • For an extra touch, sprinkle some herbs on top before baking.

How to Serve

This torta is incredibly versatile! Here are some serving suggestions:

  • Serve it warm with a side salad for a complete meal.
  • Cut it into small squares for a delightful appetizer at your next gathering.
  • Pair it with a creamy garlic pasta for a comforting dinner.
  • Enjoy it cold as a snack or lunch option.

Make Ahead and Storage

If you want to prepare this dish in advance, you can make it a day ahead and store it in the refrigerator. Just reheat it in the oven before serving. For storage:

  • Keep leftovers in an airtight container in the fridge for up to 3 days.
  • You can also freeze it for up to a month. Just make sure to wrap it tightly!

So there you have it! A delightful and easy recipe that’s perfect for weeknight dinner ideas or any occasion. I hope you enjoy making and sharing this Torta de Presunto e Queijo de Liquidificador as much as I do. Happy cooking!

Torta de Presunto e Queijo de Liquidificador

Prep Time 15 minutes
Cook Time 45 minutes
Total Time 1 hour
Servings 8 pieces
Calories 350
A delicious Brazilian savory cake combining ham and cheese, perfect for a quick snack or meal.

Ingredients

group

  • 3 eggs eggs
  • 2 cups milk
  • 1 cup oil
  • 2 cups flour de trigo
  • 1 soup spoon fermento em pó
  • Sal a gosto salt
  • 200 grams presunto picado
  • 200 grams queijo mussarela ralado ou picado
  • 1 unit tomate picado sem sementes
  • Orégano a gosto oregano
  • Azeitonas picadas (opcional) olives (optional)

Instructions 

  • Preaqueça o forno a 180°C e unte uma forma com margarina e farinha.
  • Bata os ovos, leite, óleo, farinha, fermento e sal no liquidificador até obter uma massa homogênea.
  • Adicione o presunto, queijo, tomate, orégano e azeitonas à massa e misture suavemente.
  • Despeje a massa na forma untada e asse por cerca de 45 minutos ou até dourar.

Notes

Sirva com salada verde, vinagrete ou molho de sua preferência.
Calories: 350kcal
Cost: $15
Course: Main Course
Cuisine: Brazilian
Keyword: baking, cheese, ham

Have you ever craved a dessert that’s not only delicious but also incredibly easy to make? Well, let me introduce you to my favorite treat: Pudim na Caixinha de Leite sem Fogo. This creamy, no-cook caramelized pudding is a delightful way to satisfy your sweet tooth without spending hours in the kitchen. Plus, it’s perfect for those busy weeknights when you’re juggling quick family dinners and need something special to end the day. Trust me, this recipe is a game-changer!

Why You’ll Love This Recipe

  • It’s a no-cook dessert, making it super simple and quick to prepare.
  • Perfect for impressing guests or enjoying a cozy night in.
  • Uses just a few ingredients you probably already have at home.
  • Can be made ahead of time, freeing up your schedule for other activities.
  • It’s a delightful treat that everyone in the family will love!

Ingredients

To whip up this delicious Pudim na Caixinha de Leite sem Fogo, you’ll need the following ingredients:

  • 1 can of sweetened condensed milk
  • 2 cups of milk
  • 1 packet of unflavored gelatin
  • 1 cup of sugar (for caramel)
  • 1 teaspoon of vanilla extract

Full ingredient list with measurements is provided in the printable recipe card below.

How to Make the Recipe

Now, let’s dive into the fun part—making this delightful pudding! Follow these simple steps:

  1. In a small bowl, dissolve the unflavored gelatin in 1/4 cup of cold water. Let it sit for about 5 minutes until it blooms.
  2. In a blender, combine the sweetened condensed milk, milk, vanilla extract, and the bloomed gelatin. Blend until smooth and creamy.
  3. In a saucepan, melt the sugar over medium heat until it turns golden brown. Quickly pour the caramel into a mold, swirling it around to coat the bottom. Pour the pudding mixture over the caramel and refrigerate for at least 4 hours or until set.

Pro Tips for Making the Recipe

Here are some of my favorite tips to ensure your Pudim na Caixinha de Leite sem Fogo turns out perfectly:

  • Make sure to blend the mixture thoroughly to achieve that creamy texture.
  • Don’t rush the caramel process; watch it closely to prevent burning.
  • For a fun twist, add a splash of coffee or chocolate to the pudding mixture for a different flavor.
  • Use a silicone mold for easy removal of the pudding once it’s set.

How to Serve

Once your pudding is set, it’s time to serve! Here are some delightful serving suggestions:

  • Garnish with fresh berries or a sprinkle of cocoa powder for a pop of color.
  • Serve with a dollop of whipped cream for added indulgence.
  • Pair it with a cup of coffee or tea for a cozy dessert experience.
  • For a fun family night, let everyone add their favorite toppings!

Make Ahead and Storage

This pudding is perfect for making ahead of time! Here’s how to store it:

  • Keep the pudding covered in the refrigerator for up to 5 days.
  • If you want to make it even earlier, you can freeze it for up to a month. Just remember to let it thaw in the fridge before serving.
  • For a quick weeknight dinner idea, pair this dessert with easy pasta recipes or 30-minute meals to create a complete meal that your family will love!

So there you have it! A simple, delicious, and creamy dessert that’s sure to impress. I hope you enjoy making and sharing this Pudim na Caixinha de Leite sem Fogo with your loved ones. It’s a sweet way to end any meal, especially when paired with a delightful creamy garlic pasta dish for a perfect weeknight dinner idea. Happy cooking!

Pudim na Caixinha de Leite sem Fogo

Prep Time 10 minutes
Total Time 10 minutes
Servings 8 pieces
Calories 350
A no-bake Brazilian-style flan made with sweetened condensed milk, cream, and gelatin, perfect for a quick and delicious dessert.

Ingredients

Dairy Products

  • 1 caixinha leite condensado ((395 g))
  • 1 caixinha creme de leite ((200 g))
  • 1 caixinha leite (use the same measure as the condensed milk)

Gelatin

  • 12 g gelatina incolor sem sabor (incolor, flavorless)
  • 5 tablespoons água (for hydrating gelatin)

Sugar

  • 1 cup açúcar

Instructions 

  • Prepare the calda by caramelizing sugar in a low heat until golden, then pour into individual molds and set aside.
  • Hydrate the gelatin with water and dissolve over low heat, then let it cool slightly.
  • Mix the condensed milk, cream, milk, and dissolved gelatin until smooth and homogeneous.
  • Pour the mixture over the caramelized molds and refrigerate for at least 5 hours until firm.

Notes

You can adjust the sweetness to taste by reducing or increasing the sugar.
Calories: 350kcal
Cost: $15
Course: Dessert
Cuisine: Brazilian
Keyword: pudding

Have you ever craved a delightful pastry that transports you straight to the vibrant streets of Brazil? Well, let me introduce you to Empadinhas com Massa de Guaraná! These delicious Brazilian pastries are not only a treat for your taste buds but also a fantastic option for quick family dinners. With a unique guaraná twist, they are sure to impress your family and friends. Plus, they fit perfectly into the category of easy pasta recipes, making them a versatile addition to your weeknight dinner ideas!

Why You’ll Love This Recipe

  • Quick and easy to prepare, perfect for busy weeknights.
  • Unique flavor from guaraná that will surprise and delight.
  • Great for family gatherings or as a snack for movie night.
  • Can be made ahead and stored for later enjoyment.
  • Perfectly pairs with a creamy garlic pasta for a complete meal!

Ingredients

To make these scrumptious Empadinhas, you’ll need the following ingredients:

  • 2 cups all-purpose flour
  • 1/2 cup unsalted butter, softened
  • 1/4 cup guaraná soda
  • 1/2 teaspoon salt
  • 1 egg, beaten (for egg wash)
  • Filling of your choice (chicken, beef, or vegetables)

Full ingredient list with measurements is provided in the printable recipe card below.

How to Make the Recipe

Now, let’s dive into the fun part—making these delightful pastries!

  1. In a large mixing bowl, combine the flour and salt.
  2. Add the softened butter and mix until crumbly.
  3. Gradually pour in the guaraná soda, mixing until a dough forms.
  4. Wrap the dough in plastic wrap and refrigerate for about 30 minutes.
  5. Preheat your oven to 375°F (190°C).
  6. Roll out the dough on a floured surface to about 1/8 inch thick.
  7. Cut out circles using a cookie cutter or a glass.
  8. Place a spoonful of your chosen filling in the center of each circle.
  9. Fold the dough over to create a half-moon shape and seal the edges with a fork.
  10. Brush the tops with the beaten egg for a golden finish.
  11. Bake for 20-25 minutes or until golden brown.
  12. Let them cool slightly before serving. Enjoy!

Pro Tips for Making the Recipe

Here are some of my favorite tips to ensure your Empadinhas turn out perfectly:

  • Make sure your butter is softened but not melted for the best texture.
  • Experiment with different fillings to find your favorite combination.
  • If you’re short on time, use store-bought pastry dough instead of making your own.
  • For a fun twist, add some spices to your filling for an extra kick!
  • These pastries freeze well, so make a double batch and save some for later!

How to Serve

These Empadinhas are incredibly versatile! Here are some serving suggestions:

  • Serve them warm with a side of dipping sauce, like a spicy aioli or a tangy salsa.
  • Pair them with a refreshing salad for a light lunch.
  • For a complete meal, enjoy them alongside a creamy garlic pasta.
  • They also make a fantastic appetizer for parties or gatherings!

Make Ahead and Storage

If you’re planning a busy week, these pastries are perfect for making ahead. Here’s how to store them:

  • Once baked, let the Empadinhas cool completely before storing.
  • Place them in an airtight container in the refrigerator for up to 3 days.
  • For longer storage, freeze them in a single layer on a baking sheet, then transfer to a freezer bag for up to 3 months.
  • To reheat, simply pop them in the oven at 350°F (175°C) for about 10-15 minutes until warmed through.

So there you have it! A delightful recipe for Empadinhas com Massa de Guaraná that’s perfect for quick family dinners, easy pasta recipes, and 30-minute meals. I hope you enjoy making and sharing these delicious Brazilian pastries as much as I do. Happy cooking!

Empadinhas com Massa de Guaraná

Prep Time 30 minutes
Cook Time 30 minutes
Total Time 1 hour
Servings 12 pieces
Calories 250
Delicious Brazilian savory pastries with a unique guaraná-infused dough and flavorful chicken filling.

Ingredients

Dough

  • 2 cups flour of wheat
  • 0.5 cup cold butter
  • 1 whole egg
  • 0.25 cup guaraná (soda)
  • to taste salt

Filling

  • 2 tablespoons olive oil
  • 1 chopped onion
  • 2 cloves garlic
  • 2 cups cooked shredded chicken
  • 1 diced tomato without seeds
  • 0.5 cup green corn
  • 0.5 cup creamy requeijão
  • to taste herbs parsley and chives
  • to taste seasonings salt and black pepper
  • 1 egg yolk for brushing

Instructions 

  • Mix flour, butter, egg, guaraná, and salt to form a dough. Chill for 30 minutes.
  • Prepare filling: sauté onion and garlic in olive oil, add chicken, tomato, corn, requeijão, herbs, salt, and pepper. Cook for 10 minutes.
  • Roll out dough, cut into circles, place filling, and seal edges. Brush with egg yolk.
  • Bake at 180°C (356°F) for 30 minutes until golden brown.

Notes

Serve warm with a side salad or as a snack.
Calories: 250kcal
Cost: $15
Course: Appetizer
Cuisine: Brazilian
Keyword: empanadas

Oh, my goodness! If you’re looking for a sweet escape that’s as delightful as a sunny afternoon, you’ve come to the right place! Today, I’m excited to share with you my favorite Brazilian dessert, Sobremesa Moça de Coco. This creamy coconut delight is not only a treat for your taste buds but also a fantastic way to impress your family and friends. And let me tell you, it’s as easy as whipping up some of those easy pasta recipes we all love! So, grab your apron, and let’s dive into this delicious adventure!

Why You’ll Love This Recipe

  • It’s incredibly creamy and rich, perfect for coconut lovers!
  • Quick to prepare, making it ideal for those busy weeknights.
  • Perfect for gatherings or a sweet treat after a quick family dinner.
  • Can be made ahead of time, so you can enjoy it whenever you want!
  • It’s a unique dessert that will wow your guests!

Ingredients

To make this luscious Sobremesa Moça de Coco, you’ll need the following ingredients:

  • 1 can of sweetened condensed milk
  • 1 can of coconut milk
  • 1 cup of shredded coconut (unsweetened for a more authentic taste)
  • 1 tablespoon of cornstarch
  • 1 teaspoon of vanilla extract
  • Pinch of salt
  • Optional: toasted coconut flakes for garnish

Full ingredient list with measurements is provided in the printable recipe card below.

How to Make the Recipe

Now, let’s get to the fun part—making this creamy coconut delight!

  1. In a medium saucepan, combine the sweetened condensed milk, coconut milk, and shredded coconut.
  2. In a small bowl, mix the cornstarch with a few tablespoons of water to create a slurry. This will help thicken our dessert.
  3. Stir the cornstarch mixture into the saucepan and add the vanilla extract and a pinch of salt.
  4. Cook over medium heat, stirring constantly until the mixture thickens and starts to bubble. This should take about 5-7 minutes.
  5. Once thickened, remove from heat and pour the mixture into a serving dish or individual cups.
  6. Let it cool to room temperature, then refrigerate for at least 2 hours to set.
  7. Before serving, top with toasted coconut flakes if desired. Enjoy!

Pro Tips for Making the Recipe

Here are some of my favorite tips to ensure your Sobremesa Moça de Coco turns out perfectly:

  • Make sure to stir constantly while cooking to prevent the mixture from sticking to the bottom of the pan.
  • If you prefer a sweeter dessert, feel free to add a bit more sweetened condensed milk.
  • For a fun twist, try adding a splash of rum or coconut extract for extra flavor!
  • This dessert can be made a day in advance, making it a great option for weeknight dinner ideas or gatherings.

How to Serve

Serving Sobremesa Moça de Coco is a breeze! You can present it in individual cups for a more elegant touch or serve it in a large dish for a family-style dessert. Pair it with fresh fruit like mango or berries for a refreshing contrast. It’s also delightful alongside a cup of coffee or tea, making it a perfect end to a lovely meal. Speaking of meals, if you’re looking for 30-minute meals to pair with this dessert, check out my favorite creamy garlic pasta recipe!

Make Ahead and Storage

This creamy coconut delight is perfect for making ahead of time! Just prepare it as directed, let it cool, and store it in the refrigerator. It will keep well for up to 3 days, so you can enjoy it whenever the craving strikes. Just remember to cover it with plastic wrap or a lid to keep it fresh. If you’re planning a gathering, this dessert is a fantastic make-ahead option that will save you time and stress!

So there you have it! Sobremesa Moça de Coco is not just a dessert; it’s a celebration of flavors and a wonderful way to bring a taste of Brazil into your home. I hope you enjoy making and sharing this creamy coconut delight as much as I do. Happy cooking!

Sobremesa Moça de Coco

Prep Time 10 minutes
Cook Time 15 minutes
Total Time 25 minutes
Servings 8 pieces
Calories 350
A delicious Brazilian coconut dessert that combines creamy and sweet flavors, perfect for satisfying your sweet tooth.

Ingredients

Base

  • 1 can sweetened condensed milk (395 g can, e.g., Moça)
  • 1 can unsweetened cream (200 g can)
  • 200 ml coconut milk
  • 1 cup fresh shredded coconut (or dried without sugar)
  • 2 tbsp sugar
  • 1 tbsp butter
  • 1 tsp vanilla essence (optional)

Decoration

  • to taste extra shredded coconut (for garnish)

Instructions 

  • Combine the sweetened condensed milk, cream, coconut milk, shredded coconut, sugar, butter, and vanilla in a pan.
  • Cook over low heat, stirring constantly, for about 15 minutes until the mixture thickens.
  • Pour into a dish and let it cool. Decorate with extra shredded coconut before serving.

Notes

Keep refrigerated and serve chilled for best flavor.
Calories: 350kcal
Cost: $15
Course: Dessert
Cuisine: Brazilian
Keyword: coconut

Oh, the joy of crispy potatoes! If you’re like me, you know that the perfect side dish can elevate any meal, especially during those busy weeknights when quick family dinners are a must. Today, I’m excited to share my recipe for Batata à Milanesa Crocante, a delightful way to enjoy crispy potatoes that pairs beautifully with just about anything. Plus, it’s a fantastic addition to your repertoire of easy pasta recipes, making it a versatile choice for your dinner table!

Why You’ll Love This Recipe

  • Quick and easy to prepare, perfect for busy weeknights.
  • Deliciously crispy texture that everyone will love.
  • Versatile side dish that complements a variety of main courses.
  • Great for meal prep and can be made ahead of time.
  • Perfect for serving alongside creamy garlic pasta or any of your favorite 30-minute meals.

Ingredients

To make these crispy potatoes, you’ll need just a few simple ingredients that you probably already have in your pantry. Here’s what you’ll need:

  • 4 large potatoes, peeled and sliced
  • 1 cup all-purpose flour
  • 2 large eggs, beaten
  • 2 cups breadcrumbs (preferably panko for extra crunch)
  • Salt and pepper to taste
  • Vegetable oil for frying

Full ingredient list with measurements is provided in the printable recipe card below.

How to Make the Recipe

Now, let’s dive into the steps to create these delicious Batata à Milanesa Crocante:

  1. Start by peeling and slicing your potatoes into thin rounds. Aim for about 1/4 inch thick for the best results.
  2. In a large bowl, season the flour with salt and pepper. In another bowl, beat the eggs. In a third bowl, place the breadcrumbs.
  3. Heat about 1 inch of vegetable oil in a large skillet over medium heat.
  4. Coat each potato slice in the flour, shaking off any excess. Then, dip it into the beaten eggs, and finally, coat it with breadcrumbs.
  5. Carefully place the coated potato slices into the hot oil, frying them in batches to avoid overcrowding. Fry until golden brown and crispy, about 3-4 minutes per side.
  6. Once cooked, transfer the crispy potatoes to a paper towel-lined plate to drain any excess oil. Season with a little more salt if desired.

Pro Tips for Making the Recipe

Here are some of my favorite tips to ensure your Batata à Milanesa Crocante turns out perfectly every time:

  • For extra flavor, add some garlic powder or paprika to the flour mixture.
  • Make sure the oil is hot enough before adding the potatoes; this helps achieve that perfect crispy texture.
  • If you want to make this a healthier option, consider baking the potatoes instead of frying. Just spray them with a little oil and bake at 425°F until crispy.
  • These crispy potatoes can be made ahead of time and reheated in the oven for a quick side dish.

How to Serve

These crispy potatoes are incredibly versatile! Here are some serving suggestions:

  • Serve them alongside your favorite protein, like grilled chicken or steak.
  • Pair them with a fresh salad for a light meal.
  • They make a fantastic side for any of your easy pasta recipes, especially creamy garlic pasta!
  • Top them with cheese and herbs for a delicious twist.

Make Ahead and Storage

If you’re planning a busy week, you can make these crispy potatoes ahead of time! Here’s how:

  • Prepare the potatoes and coat them as instructed, then store them in the refrigerator for up to 24 hours before frying.
  • Cooked potatoes can be stored in an airtight container in the fridge for up to 3 days. Reheat them in the oven to regain their crispiness.
  • For longer storage, freeze the uncooked, coated potato slices. When you’re ready to enjoy them, fry them straight from the freezer, adding a couple of extra minutes to the cooking time.

So there you have it! My delightful recipe for Batata à Milanesa Crocante is not only easy to make but also a fantastic addition to your collection of weeknight dinner ideas. I hope you enjoy making and sharing these crispy potatoes with your family as much as I do. Happy cooking!

Batata à Milanesa Crocante

Prep Time 15 minutes
Cook Time 20 minutes
Total Time 35 minutes
Servings 4 servings
Calories 250
A crispy and delicious Brazilian-style potato dish, perfect as an appetizer or side.

Ingredients

main

  • 5 medium batatas médias (sliced into rounds)
  • 2 eggs ovos batidos
  • 3 tablespoons farinha de trigo
  • 4 tablespoons farinha de rosca
  • 1 tablespoon sal (for boiling potatoes)
  • to taste sal, pimenta-do-reino e orégano (to season)
  • as needed óleo para fritar (for frying)

Instructions 

  • Cozinhe as batatas em água salgada até ficarem macias, escorra e deixe esfriar.
  • Separe as rodelas de batata, tempere com sal, pimenta-do-reino e orégano.
  • Passe as rodelas na farinha de trigo, depois nos ovos batidos e por último na farinha de rosca.
  • Frite em óleo quente até dourar e crocante, escorra em papel toalha.

Notes

Para uma crocância extra, deixe as batatas empanadas na geladeira por 30 minutos antes de fritar.
Calories: 250kcal
Cost: $15
Course: Side Dish
Cuisine: Brazilian
Keyword: potato

Oh, my goodness! If you’re anything like me, you know that nothing beats the joy of a rich, moist chocolate cake. Today, I’m thrilled to share my favorite recipe for Bolo Nega Maluca Fofinho Molhadinho. This cake is not just a treat; it’s a celebration of flavors that will make your taste buds dance! And let me tell you, it’s perfect for those busy weeknights when you want something sweet but don’t have hours to spend in the kitchen. Plus, it pairs wonderfully with quick family dinners or even as a delightful dessert after one of those easy pasta recipes you whip up in a flash!

Why You’ll Love This Recipe

  • It’s incredibly moist and fudgy, making it a chocolate lover’s dream.
  • Simple ingredients that you probably already have in your pantry.
  • Perfect for any occasion, from casual weeknight dinners to special celebrations.
  • Quick to prepare, so you can enjoy it in no time!
  • It’s a crowd-pleaser that will impress your family and friends.

Ingredients

To make this delightful Bolo Nega Maluca Fofinho Molhadinho, you’ll need the following ingredients:

  • 1 cup of all-purpose flour
  • 1 cup of sugar
  • 1/2 cup of unsweetened cocoa powder
  • 1 teaspoon of baking powder
  • 1/2 teaspoon of baking soda
  • 1/4 teaspoon of salt
  • 1/2 cup of vegetable oil
  • 1 cup of hot water
  • 1 teaspoon of vanilla extract
  • 1 tablespoon of apple cider vinegar

Full ingredient list with measurements is provided in the printable recipe card below.

How to Make the Recipe

Now, let’s dive into the fun part—making this delicious cake!

  1. Preheat your oven to 350°F (175°C) and grease a 9-inch round cake pan.
  2. In a large mixing bowl, combine the flour, sugar, cocoa powder, baking powder, baking soda, and salt. Whisk them together until well blended.
  3. Add the vegetable oil, hot water, vanilla extract, and apple cider vinegar to the dry ingredients. Mix until smooth and well combined.
  4. Pour the batter into the prepared cake pan and bake for about 30-35 minutes, or until a toothpick inserted in the center comes out clean.
  5. Once baked, let the cake cool in the pan for 10 minutes before transferring it to a wire rack to cool completely.

Pro Tips for Making the Recipe

Here are some of my favorite tips to ensure your Bolo Nega Maluca Fofinho Molhadinho turns out perfectly:

  • Make sure your ingredients are at room temperature for better mixing.
  • Don’t skip the apple cider vinegar; it adds moisture and enhances the cake’s texture.
  • For an extra chocolatey experience, consider adding chocolate chips to the batter!
  • Let the cake cool completely before frosting or serving to maintain its moistness.

How to Serve

This cake is delightful on its own, but you can elevate it even further! Here are some serving suggestions:

  • Dust with powdered sugar for a simple yet elegant touch.
  • Serve with a scoop of vanilla ice cream for a classic dessert.
  • Pair it with fresh berries for a refreshing contrast.
  • Drizzle with chocolate sauce or a creamy frosting for an indulgent treat.

Make Ahead and Storage

This cake is perfect for making ahead of time! Here’s how to store it:

  • Store the cooled cake in an airtight container at room temperature for up to 3 days.
  • If you want to keep it longer, wrap it tightly in plastic wrap and freeze for up to 3 months.
  • To serve after freezing, let it thaw in the refrigerator overnight before enjoying.

So there you have it! A deliciously moist and fudgy Bolo Nega Maluca Fofinho Molhadinho that’s perfect for any occasion. Whether you’re looking for a sweet treat after one of your 30-minute meals or a delightful dessert to impress your guests, this cake is sure to be a hit. Enjoy baking, and don’t forget to share your creations with friends and family!

Bolo Nega Maluca Fofinho e Molhadinho

Prep Time 20 minutes
Cook Time 40 minutes
Total Time 1 hour
Servings 8 slices
Calories 350
A delicious, moist chocolate cake perfect for any occasion, combining rich flavors with a soft texture.

Ingredients

group

  • 3 units ovos
  • 1 cup açúcar
  • 1 cup chocolate em pó (ou cacau)
  • 0.5 cup óleo
  • 1 cup água quente
  • 2 cups farinha de trigo peneirada
  • 1 sopa fermento em pó
  • 0.5 cup leite (para cobertura)
  • 1 sopa manteiga (para cobertura)
  • 3 sopa açúcar (para cobertura)
  • 8 sopa chocolate em pó (para cobertura)

Instructions 

  • Preaqueça o forno a 180°C e unte uma forma redonda de 25 cm com manteiga e farinha.
  • Bata os ovos com o açúcar até obter uma mistura homogênea.
  • Adicione o chocolate em pó, o óleo e a água quente, misturando bem.
  • Incorpore a farinha de trigo e o fermento, mexendo delicadamente.
  • Despeje a massa na forma e asse por 40 minutos ou até que um palito saia limpo.
  • Para a cobertura, misture o leite, manteiga, açúcar e chocolate em pó até obter um creme homogêneo.
  • Desenforme o bolo e cubra com a ganache de chocolate ainda quente.

Notes

Para um sabor mais intenso, substitua o cacau por chocolate em barra derretido.
Calories: 350kcal
Cost: $15
Course: Dessert
Cuisine: Brazilian
Keyword: chocolate

Oh, my goodness! If you’re looking for a sweet treat that will make your taste buds dance, you’ve come to the right place! Today, I’m excited to share my recipe for Rosquinha de Colher Fofinha com Coco, a delightful coconut dessert that’s perfect for any occasion. Whether you’re planning a family gathering or just want to indulge in something sweet after a long day, this recipe is sure to impress. And let’s be honest, who doesn’t love a quick and easy dessert that feels like a warm hug? Plus, if you’re in the mood for some easy pasta recipes for dinner, I’ve got you covered there too!

Why You’ll Love This Recipe

  • It’s incredibly easy to make, perfect for busy weeknights.
  • Rich coconut flavor that will transport you to a tropical paradise.
  • Perfect for sharing with family and friends at gatherings.
  • Can be made ahead of time for those last-minute dessert cravings.
  • Pairs wonderfully with coffee or tea for a delightful afternoon treat.

Ingredients

To whip up these irresistible coconut sweets, you’ll need the following ingredients:

  • 1 cup of shredded coconut
  • 1 cup of sweetened condensed milk
  • 1 cup of all-purpose flour
  • 1 teaspoon of baking powder
  • 1/2 cup of unsalted butter, softened
  • 1/2 teaspoon of vanilla extract
  • A pinch of salt

Full ingredient list with measurements is provided in the printable recipe card below.

How to Make the Recipe

Now, let’s get to the fun part—making these delicious Rosquinhas!

  1. Preheat your oven to 350°F (175°C) and line a baking sheet with parchment paper.
  2. In a large mixing bowl, cream together the softened butter and sweetened condensed milk until smooth.
  3. Add in the vanilla extract and mix well.
  4. In another bowl, combine the flour, baking powder, shredded coconut, and salt.
  5. Gradually add the dry ingredients to the wet mixture, stirring until well combined.
  6. Using a spoon, drop dollops of the mixture onto the prepared baking sheet, leaving some space between each.
  7. Bake for 15-20 minutes or until the edges are golden brown.
  8. Let them cool slightly before serving. Enjoy!

Pro Tips for Making the Recipe

Here are some of my favorite tips to ensure your Rosquinha de Colher turns out perfectly:

  • Make sure your butter is softened to room temperature for easy mixing.
  • For an extra coconut kick, feel free to sprinkle some toasted coconut on top before baking.
  • If you prefer a sweeter treat, you can add a bit more sweetened condensed milk to the batter.
  • Don’t skip the cooling step; they’ll be easier to handle and taste even better!

How to Serve

These delightful coconut sweets are perfect for any occasion! Here are some serving suggestions:

  • Serve them warm with a scoop of vanilla ice cream for a decadent dessert.
  • Pair them with a cup of coffee or tea for a delightful afternoon snack.
  • They make a great addition to any dessert table at parties or family gatherings.
  • Wrap them up in a cute box for a thoughtful homemade gift.

Make Ahead and Storage

If you’re like me and love to plan ahead, you’ll be happy to know that these Rosquinhas can be made in advance! Here’s how to store them:

  • Store them in an airtight container at room temperature for up to 3 days.
  • For longer storage, you can freeze them for up to a month. Just make sure to separate layers with parchment paper to prevent sticking.
  • To enjoy them after freezing, simply let them thaw at room temperature for a few hours.

So there you have it! A delightful recipe for Rosquinha de Colher Fofinha com Coco that’s sure to become a family favorite. And while you’re at it, don’t forget to check out my quick family dinners and 30-minute meals for more delicious ideas! If you’re in the mood for something creamy, my creamy garlic pasta is a must-try! Happy baking!

Rosquinha de Colher – Fofinha com Coco

Prep Time 30 minutes
Cook Time 20 minutes
Total Time 50 minutes
Servings 20 pieces
Calories 250
A delicious Brazilian treat, these soft coconut-flavored spoon cookies are perfect for a sweet snack or dessert.

Ingredients

Dough

  • 1 can leite condensado
  • 3 units ovos
  • 1 can leite
  • 50 g fermento biológico
  • 1 can óleo (350ml)
  • 1 can água morna
  • 5 tbsp açúcar
  • 1 kg farinha de trigo
  • 1 pinch sal
  • 1 cup açúcar (para calda)
  • 1/2 cup leite (para calda)
  • Coco ralado para finalizar (para calda)

Instructions 

  • Combine leite condensado, ovos, leite, fermento, óleo, água morna, açúcar, farinha, and salt. Mix until smooth.
  • Pour batter into a greased pan and bake at 180°C (356°F) for about 20 minutes until golden.
  • Prepare the syrup by mixing sugar, milk, and coconut. Pour over hot baked cake and top with shredded coconut.

Notes

Enjoy fresh or chilled for best flavor.
Calories: 250kcal
Cost: $15
Course: Dessert
Cuisine: Brazilian
Keyword: coconut