Author

thomas

Browsing

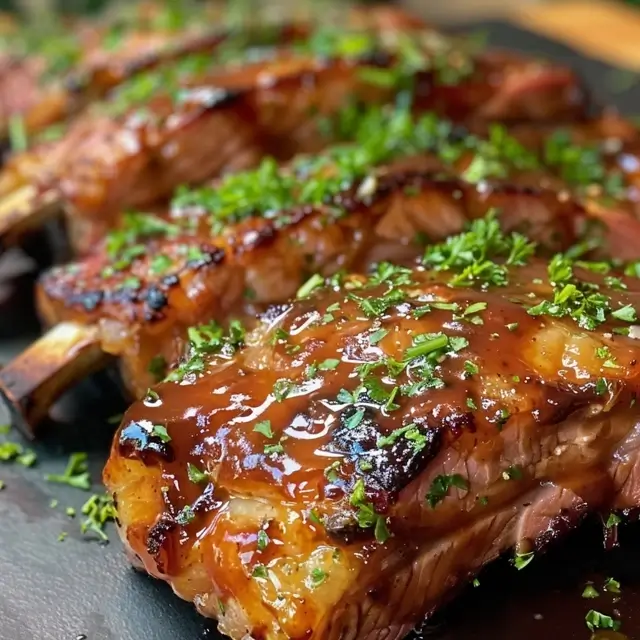
There’s something incredibly satisfying about sinking your teeth into a plate of juicy, tender ribs, especially when they’re slathered in a rich barbecue sauce. Today, I’m excited to share my recipe for Costelinha ao Molho Barbecue, a dish that not only brings the family together but also fits perfectly into our busy lives. In just 40 minutes, you can whip up this delightful meal that rivals any restaurant’s offering. And if you’re looking for easy pasta recipes to pair with it, I’ve got you covered too!

Why You’ll Love This Recipe

  • Quick and easy to prepare, making it perfect for 30-minute meals.
  • Rich, flavorful barbecue sauce that will have everyone asking for seconds.
  • Perfect for quick family dinners or casual gatherings.
  • Versatile enough to pair with various sides, including my favorite creamy garlic pasta.
  • Great for meal prep and leftovers, ensuring you have delicious meals ready to go!

Ingredients

To make these mouthwatering ribs, you’ll need the following ingredients:

  • 2 pounds of pork ribs
  • 1 cup of your favorite barbecue sauce
  • 1 tablespoon of olive oil
  • 1 teaspoon of garlic powder
  • 1 teaspoon of onion powder
  • 1 teaspoon of smoked paprika
  • Salt and pepper to taste
  • Optional: fresh herbs for garnish

Full ingredient list with measurements is provided in the printable recipe card below.

How to Make the Recipe

Now, let’s dive into the cooking process! Follow these simple steps to create your own Costelinha ao Molho Barbecue:

  1. Preheat your oven to 400°F (200°C).
  2. In a large bowl, mix the olive oil, garlic powder, onion powder, smoked paprika, salt, and pepper.
  3. Rub this mixture all over the pork ribs, ensuring they are well coated.
  4. Place the ribs on a baking sheet lined with aluminum foil for easy cleanup.
  5. Bake the ribs in the preheated oven for 25 minutes.
  6. After 25 minutes, remove the ribs and generously brush them with barbecue sauce.
  7. Return the ribs to the oven and bake for an additional 10-15 minutes, or until the sauce is caramelized and sticky.
  8. Once done, let the ribs rest for a few minutes before slicing and serving.

Pro Tips for Making the Recipe

Here are some of my favorite tips to ensure your ribs turn out perfectly every time:

  • For extra tenderness, consider marinating the ribs in the spice mixture overnight.
  • If you prefer a smoky flavor, try adding a few drops of liquid smoke to the barbecue sauce.
  • Don’t skip the resting time after baking; it helps the juices redistribute for more flavorful ribs.
  • Feel free to experiment with different barbecue sauces to find your favorite flavor profile.

How to Serve

These ribs are fantastic on their own, but I love to serve them with a side of creamy garlic pasta for a complete meal. Here are some serving suggestions:

  • Pair with a fresh garden salad for a refreshing contrast.
  • Serve with coleslaw for a classic barbecue experience.
  • Offer cornbread on the side for a comforting touch.
  • Don’t forget to have extra barbecue sauce on hand for dipping!

Make Ahead and Storage

If you’re planning a busy week, these ribs are perfect for meal prep! Here’s how to store them:

  • Cooked ribs can be stored in an airtight container in the refrigerator for up to 3 days.
  • To reheat, simply place them in the oven at 350°F (175°C) until warmed through.
  • You can also freeze the cooked ribs for up to 3 months. Just make sure to wrap them tightly in foil or freezer bags.

With this Costelinha ao Molho Barbecue recipe, you’ll have a delicious meal that’s perfect for weeknight dinner ideas or special occasions. I hope you enjoy making and sharing this dish as much as I do. Happy cooking!

Costelinha ao Molho Barbecue

Prep Time 20 minutes
Cook Time 40 minutes
Total Time 1 hour
Servings 4 servings
Calories 850
Delicious pork ribs cooked with a rich barbecue sauce, perfect for a hearty meal.

Ingredients

Main

  • 1.5 kg costelinha de porco
  • 1 unit limão (suco de 1 limão)
  • 2 dentes alho amassados
  • to taste sal e pimenta-do-reino (a gosto)
  • 1 pedaço papel-alumínio
  • 2 colheres (sopa) óleo
  • 1 unidade cebola média picada
  • 0.5 xícara (chá) açúcar mascavo
  • 0.5 xícara (chá) vinagre de maçã ou branco
  • 2 colheres (sopa) molho inglês
  • 2 xícaras (chá) ketchup
  • 1 colher (sopa) molho de pimenta (opcional)
  • 0.5 xícara (chá) água
  • 1 folha louro

Estimated Cost

Instructions 

  • Tempere a carne com suco de limão, alho, sal e pimenta, e deixe marinar por 30 minutos.
  • Envolva a costelinha em papel-alumínio e asse em forno a 200°C por 40 minutos.
  • Prepare o molho barbecue refogando cebola, açúcar mascavo, vinagre, molho inglês, ketchup, molho de pimenta, água, louro e sal por 40 minutos.
  • Retire a costelinha do forno, cubra com o molho de barbecue e volte ao forno por mais 20 minutos, regando a carne com o molho a cada 5 minutos.
  • Sirva quente, acompanhada de batatas assadas ou salada coleslaw.

Notes

Para um sabor defumado, adicione pimenta defumada ao tempero.
Calories: 850kcal
Cost: $15
Course: Main Course
Cuisine: Brazilian
Keyword: barbecue, pork

There’s something truly magical about the aroma of freshly baked coffee cake wafting through the kitchen. It brings back memories of cozy mornings and warm gatherings with family and friends. Today, I’m excited to share my favorite recipe for Bolo de Café Perfeito, or the Ultimate Coffee Cake! This delightful treat is perfect for any occasion, whether you’re hosting a brunch or simply indulging in a sweet afternoon snack. Plus, it pairs beautifully with a cup of coffee or tea. And if you’re looking for easy pasta recipes to complement your meal, I’ve got you covered there too!

Why You’ll Love This Recipe

  • Rich, flavorful coffee cake that’s perfect for any time of day.
  • Simple ingredients that you probably already have in your pantry.
  • Great for sharing with family and friends during gatherings.
  • Can be made ahead of time for quick family dinners or last-minute guests.
  • Versatile enough to be served as a dessert or a breakfast treat.

Ingredients

To make this delicious Bolo de Café Perfeito, you will need the following ingredients:

  • 2 cups all-purpose flour
  • 1 cup granulated sugar
  • 1/2 cup unsalted butter, softened
  • 1 cup brewed coffee, cooled
  • 2 large eggs
  • 1 teaspoon vanilla extract
  • 1 tablespoon baking powder
  • 1/2 teaspoon salt
  • 1/2 cup chopped nuts (optional)
  • 1/2 cup chocolate chips (optional)

Full ingredient list with measurements is provided in the printable recipe card below.

How to Make the Recipe

Now, let’s dive into the step-by-step instructions to create this delightful coffee cake:

  1. Preheat your oven to 350°F (175°C) and grease a 9-inch round cake pan.
  2. In a large mixing bowl, cream together the softened butter and sugar until light and fluffy.
  3. Add the eggs, one at a time, mixing well after each addition.
  4. Stir in the vanilla extract and cooled brewed coffee.
  5. In a separate bowl, whisk together the flour, baking powder, and salt.
  6. Gradually add the dry ingredients to the wet mixture, stirring until just combined.
  7. If desired, fold in the chopped nuts and chocolate chips for an extra treat!
  8. Pour the batter into the prepared cake pan and smooth the top.
  9. Bake for 30-35 minutes, or until a toothpick inserted into the center comes out clean.
  10. Allow the cake to cool in the pan for 10 minutes before transferring it to a wire rack to cool completely.

Pro Tips for Making the Recipe

Here are some of my favorite tips to ensure your Bolo de Café Perfeito turns out perfectly every time:

  • Make sure your butter is at room temperature for easier creaming with the sugar.
  • Use freshly brewed coffee for the best flavor; it really makes a difference!
  • Don’t overmix the batter; mix until just combined to keep the cake light and fluffy.
  • Feel free to experiment with different add-ins like dried fruits or spices for a unique twist.
  • For a fun presentation, dust the cooled cake with powdered sugar or drizzle with a simple glaze.

How to Serve

This Bolo de Café Perfeito is incredibly versatile! Here are some serving suggestions:

  • Serve it warm with a dollop of whipped cream or a scoop of vanilla ice cream.
  • Pair it with a hot cup of coffee or tea for a delightful afternoon treat.
  • Slice it into squares for a casual dessert at your next gathering.
  • Enjoy it as a sweet breakfast option alongside fresh fruit.

Make Ahead and Storage

If you want to prepare this cake ahead of time, it’s super easy! Here are my tips:

  • Store the cooled cake in an airtight container at room temperature for up to 3 days.
  • You can also freeze the cake for up to 3 months. Just wrap it tightly in plastic wrap and then in aluminum foil.
  • To serve after freezing, let it thaw in the refrigerator overnight and bring it to room temperature before serving.

Now that you have the recipe for the Bolo de Café Perfeito, why not pair it with some 30-minute meals or creamy garlic pasta for a complete dinner experience? These weeknight dinner ideas will surely impress your family and friends!

Happy baking, and enjoy every delicious bite of your coffee cake masterpiece!

Bolo de Café Perfeito

Prep Time 20 minutes
Cook Time 40 minutes
Total Time 1 hour
Servings 8 slices
Calories 350
A rich and moist coffee-flavored cake perfect for coffee lovers, combining strong coffee and chocolate for a delightful treat.

Ingredients

Dough

  • 4 eggs eggs
  • 1 cup oil
  • 1.5 cups sugar refined
  • 1 cup coado forte coffee (morno)
  • 6 tablespoons coffee solúvél
  • 2 cups flour de trigo peneirada
  • 0.5 cup chocolate em pó (50% cacau)
  • 1 tablespoon fermento em pó
  • 1 can leite condensado
  • 1 tablespoon café solúvél
  • 1 tablespoon chocolate em pó (50% cacau)
  • 0.5 cup creme de leite

Instructions 

  • Mix the eggs, oil, and sugar until homogeneous.
  • Add the strong coffee, coffee solúvél, and mix well.
  • Incorporate the sifted flour, cocoa powder, and baking powder, mixing gently.
  • Pour the batter into a greased and floured pan, then bake at 180°C (356°F) for 40-45 minutes.
  • Prepare the topping by mixing condensed milk, coffee solúvél, cocoa powder, and cream de leite until smooth.
  • Spread the topping over the cooled cake and serve.

Notes

For a richer flavor, substitute some of the milk with coffee.
Calories: 350kcal
Cost: $15
Course: Dessert
Cuisine: Brazilian
Keyword: cake, chocolate, coffee

There’s something truly magical about the aroma of a freshly baked Torta de Maçã Tradicional wafting through the house. It brings back memories of family gatherings and cozy evenings spent around the table. If you’re like me and love to whip up delightful desserts that make everyone smile, then this recipe is for you! Not only is it a fantastic addition to your repertoire of easy pasta recipes for quick family dinners, but it also serves as a perfect treat for those special occasions. So, let’s dive into the world of this delicious apple pie!

Why You’ll Love This Recipe

  • Simple ingredients that you probably already have at home.
  • Perfect for any occasion, from weeknight dinners to holiday feasts.
  • Deliciously sweet and tart flavor from the green apples.
  • Flaky crust that melts in your mouth.
  • Can be made ahead of time for easy entertaining.

Ingredients

To make this delightful Torta de Maçã Tradicional, you will need the following ingredients:

  • 4 medium green apples, peeled and sliced
  • 1 cup granulated sugar
  • 1 teaspoon ground cinnamon
  • 1 tablespoon lemon juice
  • 2 tablespoons butter, melted
  • 1 pre-made pie crust (or homemade if you’re feeling adventurous!)
  • 1 egg, beaten (for egg wash)

Full ingredient list with measurements is provided in the printable recipe card below.

How to Make the Recipe

Now, let’s get to the fun part—making this scrumptious Torta de Maçã Tradicional!

  1. Preheat your oven to 375°F (190°C).
  2. In a large bowl, combine the sliced green apples, sugar, cinnamon, lemon juice, and melted butter. Toss until the apples are well coated.
  3. Roll out your pie crust and place it in a 9-inch pie dish. Make sure to press it down gently to fit the dish.
  4. Pour the apple mixture into the crust, spreading it evenly.
  5. Cover the filling with another layer of pie crust, crimping the edges to seal. Cut a few slits in the top crust to allow steam to escape.
  6. Brush the top crust with the beaten egg for a beautiful golden finish.
  7. Bake in the preheated oven for 45-50 minutes, or until the crust is golden brown and the apples are tender.
  8. Let it cool for at least 15 minutes before serving. Enjoy!

Pro Tips for Making the Recipe

Here are some of my favorite tips to ensure your Torta de Maçã Tradicional turns out perfectly:

  • Use a mix of sweet and tart apples for a more complex flavor.
  • Don’t skip the lemon juice; it enhances the flavor and keeps the apples from browning.
  • If you prefer a thicker filling, you can add a tablespoon of cornstarch to the apple mixture.
  • For an extra touch, sprinkle some oats or nuts on top of the filling before adding the second crust.
  • Serve warm with a scoop of vanilla ice cream for a delightful dessert!

How to Serve

This Torta de Maçã Tradicional is incredibly versatile! Here are some serving suggestions:

  • Pair it with a dollop of whipped cream or a scoop of ice cream for a classic dessert.
  • Serve it alongside a cup of coffee or tea for a cozy afternoon treat.
  • Slice it into smaller pieces for a delightful addition to your next brunch or potluck.
  • For a fun twist, try serving it with a drizzle of caramel sauce on top!

Make Ahead and Storage

If you’re planning for a busy week, this Torta de Maçã Tradicional can be made ahead of time! Here’s how:

  • Prepare the pie and store it unbaked in the refrigerator for up to 24 hours before baking.
  • If you have leftovers, store them in an airtight container in the refrigerator for up to 3 days.
  • You can also freeze the baked pie for up to 2 months. Just make sure to wrap it tightly in plastic wrap and aluminum foil.
  • To reheat, simply place it in a preheated oven at 350°F (175°C) for about 20-25 minutes.

Now that you have this delightful recipe in your arsenal, you can impress your family and friends with your baking skills! Whether it’s for a quick family dinner or a special occasion, this Torta de Maçã Tradicional is sure to be a hit. And remember, if you’re ever in need of weeknight dinner ideas, don’t forget to check out my collection of 30-minute meals and creamy garlic pasta recipes for more delicious options. Happy baking!

Torta de Maçã Tradicional

Prep Time 30 minutes
Cook Time 45 minutes
Total Time 1 hour 15 minutes
Servings 8 pieces
Calories 350
A classic apple tart with a flaky crust and spiced apple filling, perfect for dessert or tea time.

Ingredients

Dough

  • 2 cups flour of wheat
  • 100 g cold butter in cubes
  • 0.5 cup cream of milk with serum
  • 0.5 teaspoon salt
  • 0.5 teaspoon baking powder

Apple filling

  • 4 apples green apples sliced finely
  • 1 cup sugar
  • 3 tablespoons lemon juice
  • 1 tablespoon vanilla extract
  • 1.5 teaspoons cinnamon powder
  • to taste nutmeg grated
  • 0.5 cup bread crumbs
  • 1 egg beaten (for brushing)
  • 2 tablespoons demerara sugar (for sprinkling)

Instructions 

  • Mix flour, butter, cream, salt, and baking powder to form a dough.
  • Add grated apple, sugar, lemon juice, vanilla, cinnamon, and nutmeg to make the filling.
  • Roll out dough and place in a 25 cm tart pan, reserving some for the top.
  • Fill with apple mixture, cover with remaining dough, and brush with beaten egg.
  • Sprinkle with demerara sugar and bake at 180°C for 45 minutes.
  • Let cool before serving.

Notes

For best results, use fresh, firm apples and ensure the crust is well chilled before baking.
Calories: 350kcal
Cost: $15
Course: Dessert
Cuisine: Brazilian
Keyword: apple

Have you ever craved a dish that brings everyone together, fills your home with mouthwatering aromas, and is surprisingly easy to make? Well, let me introduce you to Carne Louca de Festa! This Brazilian favorite is not only a crowd-pleaser but also a fantastic option for quick family dinners. With its tender meat and vibrant flavors, it’s perfect for your next celebration or even a cozy weeknight dinner. Plus, if you’re looking for easy pasta recipes to pair with it, I’ve got you covered!

Why You’ll Love This Recipe

  • Quick and easy to prepare, making it ideal for busy weeknights.
  • Perfect for feeding a crowd at parties or family gatherings.
  • Versatile dish that pairs well with various sides, including creamy garlic pasta.
  • Rich in flavor, with a delightful blend of spices that will tantalize your taste buds.
  • Great for meal prep, allowing you to enjoy delicious leftovers!

Ingredients

To make the juiciest Carne Louca de Festa, you’ll need the following ingredients:

  • 2 pounds of beef (chuck roast or brisket works well)
  • 1 large onion, sliced
  • 4 cloves of garlic, minced
  • 1 bell pepper, sliced (any color you prefer)
  • 1 cup of beef broth
  • 1 tablespoon of soy sauce
  • 1 tablespoon of Worcestershire sauce
  • 1 teaspoon of paprika
  • 1 teaspoon of cumin
  • Salt and pepper to taste
  • Fresh parsley for garnish

Full ingredient list with measurements is provided in the printable recipe card below.

How to Make the Recipe

Now, let’s dive into the step-by-step process of making this delicious Carne Louca de Festa:

  1. Start by seasoning the beef with salt, pepper, paprika, and cumin. Let it sit for about 15 minutes to absorb the flavors.
  2. In a large skillet or Dutch oven, heat a bit of oil over medium-high heat. Sear the beef on all sides until it’s nicely browned. This step is crucial for locking in those juicy flavors!
  3. Once the beef is browned, remove it from the skillet and set it aside. In the same skillet, add the sliced onion, garlic, and bell pepper. Sauté until the vegetables are soft and fragrant.
  4. Return the beef to the skillet and pour in the beef broth, soy sauce, and Worcestershire sauce. Bring the mixture to a simmer.
  5. Cover the skillet and reduce the heat to low. Let it cook for about 2-3 hours, or until the meat is fork-tender. If you’re short on time, you can also use a pressure cooker for a quicker option!
  6. Once the meat is done, shred it with two forks and mix it back into the sauce. This is where the magic happens!

Pro Tips for Making the Recipe

Here are some helpful suggestions to ensure your Carne Louca de Festa turns out perfectly:

  • For extra flavor, marinate the beef overnight with the spices and sauces.
  • If you love a bit of heat, add some sliced jalapeños or red pepper flakes to the mix.
  • Don’t skip the searing step; it adds a depth of flavor that makes a big difference!
  • Feel free to adjust the spices according to your taste preferences.
  • Pair it with creamy garlic pasta for a delightful meal!

How to Serve

Carne Louca de Festa is incredibly versatile! Here are some serving suggestions:

  • Serve it on a platter with fresh bread or rolls for a delicious sandwich option.
  • Pair it with rice and beans for a traditional Brazilian meal.
  • Top it with fresh parsley and serve alongside a vibrant salad for a lighter option.
  • For a fun twist, use it as a filling for tacos or burritos!

Make Ahead and Storage

This dish is perfect for meal prep! Here’s how to store it:

  • Let the Carne Louca cool completely before transferring it to an airtight container.
  • It can be stored in the refrigerator for up to 3 days or frozen for up to 3 months.
  • When ready to enjoy, simply reheat on the stove or in the microwave until warmed through.
  • Consider making a double batch for those busy weeknights when you need quick family dinners!

So there you have it! Carne Louca de Festa is not just a recipe; it’s an experience that brings joy and flavor to your table. Whether you’re hosting a gathering or just looking for a comforting meal, this dish is sure to impress. Don’t forget to check out more easy pasta recipes to complement your meal. Happy cooking!

Carne Louca de Festa

Prep Time 30 minutes
Cook Time 1 hour
Total Time 1 hour 30 minutes
Servings 6 servings
Calories 350
A festive Brazilian dish featuring tender beef with flavorful vegetables and spices, perfect for celebrations.

Ingredients

Main Ingredients

  • 1.5 kg de coxão mole ou acém
  • 3 cloves de alho amassados
  • 3 leaves de louro
  • 1 cup vinagre de vinho branco
  • 1 liter água quente
  • Sal e pimenta-do-reino a gosto Sal e pimenta-do-reino (a gosto)
  • 3 tablespoons azeite
  • 2 large cebolas em fatias finas
  • 1 red pimentão em tiras (vermelho)
  • 1 green pimentão em tiras (verde)
  • 0.5 teaspoon orégano
  • 0.5 teaspoon páprica doce (opcional)
  • 1 can molho de tomate (340g)
  • 0.5 cup caldo do cozimento reservado

Instructions 

  • Desfie o carne, reserve o caldo do cozimento.
  • Refogue o alho, a cebola, os pimentões e os temperos no azeite.
  • Adicione a carne desfiada, o molho de tomate, o caldo reservado e cozinhe por 40 minutos.
  • Finalize ajustando o sal e pimenta, sirva quente.

Notes

Para um sabor mais intenso, deixe a carne desfiada na geladeira por 3 dias antes de servir.
Calories: 350kcal
Cost: $15
Course: Main Course
Cuisine: Brazilian
Keyword: beef

Are you looking for a delicious and nutritious snack that fits perfectly into your busy lifestyle? Well, look no further! Today, I’m excited to share my recipe for Bolo Proteico de Whey com Banana, a protein-packed treat that not only satisfies your sweet tooth but also aligns with your fitness goals. This delightful cake is not just a snack; it’s a fantastic way to fuel your day, especially if you’re juggling quick family dinners or searching for easy pasta recipes to complement your meals. Let’s dive into this scrumptious recipe!

Why You’ll Love This Recipe

  • High in protein, perfect for post-workout recovery.
  • Made with wholesome ingredients, including bananas for natural sweetness.
  • Quick and easy to prepare, making it ideal for busy weeknights.
  • Versatile enough to enjoy as a breakfast option or a snack.
  • Great for meal prep, so you can have healthy treats on hand!

Ingredients

To make this delightful Bolo Proteico de Whey com Banana, you’ll need the following ingredients:

  • 2 ripe bananas
  • 1 cup of oats
  • 1/2 cup of whey protein powder (vanilla or chocolate flavor)
  • 1/4 cup of honey or maple syrup
  • 1/2 cup of Greek yogurt
  • 2 eggs
  • 1 teaspoon of baking powder
  • 1 teaspoon of cinnamon
  • A pinch of salt

Full ingredient list with measurements is provided in the printable recipe card below.

How to Make the Recipe

Now, let’s get to the fun part—making this delicious cake! Follow these simple steps:

  1. Preheat your oven to 350°F (175°C) and grease a loaf pan.
  2. In a large mixing bowl, mash the ripe bananas until smooth.
  3. Add the oats, whey protein powder, honey (or maple syrup), Greek yogurt, eggs, baking powder, cinnamon, and salt to the bowl. Mix until well combined.
  4. Pour the batter into the prepared loaf pan and smooth the top with a spatula.
  5. Bake for 30-35 minutes, or until a toothpick inserted into the center comes out clean.
  6. Let it cool for a few minutes before slicing. Enjoy your healthy snack!

Pro Tips for Making the Recipe

Here are some of my favorite tips to ensure your Bolo Proteico de Whey com Banana turns out perfectly:

  • Make sure your bananas are very ripe for the best flavor and sweetness.
  • You can substitute the oats with almond flour for a gluten-free version.
  • Add nuts or chocolate chips for an extra treat!
  • Don’t overmix the batter; just combine until everything is incorporated.
  • Check for doneness a few minutes before the timer goes off to avoid overbaking.

How to Serve

This protein-packed cake is incredibly versatile! Here are some serving suggestions:

  • Enjoy it plain as a quick snack.
  • Spread a little almond butter or peanut butter on top for added flavor.
  • Pair it with a side of fresh fruit for a balanced breakfast.
  • Serve it warm with a dollop of Greek yogurt for a delightful dessert.
  • Slice it up and pack it for a healthy on-the-go snack for your kids!

Make Ahead and Storage

This Bolo Proteico de Whey com Banana is perfect for meal prep! Here’s how to store it:

  • Once cooled, wrap the cake tightly in plastic wrap or aluminum foil.
  • Store it in the refrigerator for up to a week.
  • You can also freeze individual slices for up to three months. Just thaw them in the fridge overnight before enjoying!

Now that you have this fantastic recipe in your arsenal, you can easily whip up a healthy snack that the whole family will love. Whether you’re looking for quick family dinners or just a sweet treat to enjoy, this Bolo Proteico de Whey com Banana is sure to please. And remember, if you’re ever in need of 30-minute meals or weeknight dinner ideas, don’t hesitate to explore some easy pasta recipes like creamy garlic pasta to complement your healthy lifestyle. Happy baking!

Bolo Proteico de Whey com Banana

Prep Time 10 minutes
Cook Time 15 minutes
Total Time 25 minutes
Servings 1 slice
Calories 250
Delicious and nutritious protein cake combining whey, banana, and cocoa for a healthy treat.

Ingredients

group

  • 1 scoop Whey Protein (sabor chocolate)
  • 1 unit banana amassada
  • 1 unit ovo
  • 1 sopa cacau em pó
  • 1 sopa farinha de aveia
  • 1 sobremesa óleo de coco ou azeite
  • as needed Leite desnatado para dar ponto
  • 1 chá fermento em pó

Instructions 

  • Passo 1: Preparando os ingredientes
  • Passo 2: Adicionando o leite
  • Passo 3: Incorporando o fermento
  • Passo 4: Preparando o bolo
  • Passo 5: Cozinhando o bolo
  • Passo 6: Finalizando e servindo

Notes

Para variar o sabor, você pode usar whey de morango ou castanha.
Calories: 250kcal
Cost: $15
Course: Dessert
Cuisine: Brazilian
Keyword: banana, protein, whey

Have you ever craved something truly unique and delicious for dinner? If you’re looking for a dish that will transport your taste buds straight to Brazil, then you’re in for a treat! Today, I’m excited to share my recipe for Acarajé Baiano Tradicional. This delightful dish is made with feijão fradinho and dendê oil, and it’s perfect for those quick family dinners when you want to impress without spending hours in the kitchen. Plus, if you love easy pasta recipes, you’ll appreciate how simple and satisfying this dish can be!

Why You’ll Love This Recipe

  • Authentic Brazilian flavors that will wow your family and friends.
  • Perfect for quick family dinners or special occasions.
  • Easy to customize with your favorite fillings.
  • Great for meal prep and can be made ahead of time.
  • Fun to serve and share with loved ones!

Ingredients

To make Acarajé Baiano Tradicional, you’ll need the following ingredients:

  • 2 cups feijão fradinho (black-eyed peas)
  • 1 medium onion, chopped
  • 2 cloves garlic, minced
  • Salt to taste
  • 1 cup dendê oil (palm oil)
  • 1 cup shrimp, cooked and chopped (optional)
  • Hot sauce, to taste
  • Fresh vegetables for topping (like tomatoes and lettuce)

Full ingredient list with measurements is provided in the printable recipe card below.

How to Make the Recipe

Now, let’s dive into the fun part—making this delicious dish!

  1. Start by soaking the feijão fradinho in water overnight. This will help soften the beans and make them easier to blend.
  2. Once soaked, drain the beans and place them in a food processor with the chopped onion and garlic. Blend until you have a smooth paste.
  3. Transfer the mixture to a bowl and season with salt. Let it rest for about 30 minutes.
  4. In a deep skillet, heat the dendê oil over medium heat. You want enough oil to fry the Acarajé balls.
  5. Using your hands, form the bean mixture into small balls or patties. Carefully drop them into the hot oil, frying until golden brown on both sides.
  6. Once fried, remove the Acarajé from the oil and place them on paper towels to drain excess oil.
  7. If you’re using shrimp, you can mix it into the filling or serve it on top of the Acarajé.
  8. Serve hot with fresh vegetables and a drizzle of hot sauce!

Pro Tips for Making the Recipe

Here are some of my favorite tips to ensure your Acarajé turns out perfectly:

  • Make sure your oil is hot enough before frying; this will help achieve that crispy texture.
  • Don’t skip the resting time for the bean mixture; it helps the flavors meld together.
  • Feel free to experiment with different fillings—try adding some creamy garlic pasta as a side dish for a delightful twist!
  • If you’re short on time, consider making a batch of Acarajé on the weekend and freezing them for quick weeknight dinner ideas.

How to Serve

Serving Acarajé is all about presentation and flavor! Here are some ideas:

  • Top with fresh vegetables like lettuce, tomatoes, and onions for a refreshing crunch.
  • Serve with a side of spicy dipping sauce for an extra kick.
  • Pair with a light salad or some creamy garlic pasta for a complete meal.
  • Gather your family around the table and let everyone build their own Acarajé with their favorite toppings!

Make Ahead and Storage

If you’re planning to make Acarajé ahead of time, here are some storage tips:

  • Cooked Acarajé can be stored in an airtight container in the refrigerator for up to 3 days.
  • To freeze, place the cooled Acarajé in a single layer on a baking sheet, freeze until solid, then transfer to a freezer bag. They can be reheated in the oven or air fryer for a quick meal.
  • Prepare the bean mixture a day in advance and store it in the fridge until you’re ready to fry.

Now that you have all the secrets to making Acarajé Baiano Tradicional, I hope you’re as excited as I am to try this recipe! It’s perfect for those busy weeknights when you need 30-minute meals that don’t compromise on flavor. Enjoy this delicious Brazilian dish with your family, and don’t forget to share your experience!

Acarajé Baiano Tradicional

Prep Time 30 minutes
Cook Time 15 minutes
Total Time 45 minutes
Servings 4 servings
Calories 350
A traditional Brazilian dish from Bahia, featuring deep-fried bean balls filled with flavorful ingredients.

Ingredients

Bean Mixture

  • 500 g de feijão fradinho cru
  • 2 large cebolas picadas
  • Sal a gosto sal (to taste)
  • 500 ml azeite de dendê
  • 500 ml óleo vegetal (para fritar)
  • 150 g camarão seco
  • 2 xícaras (chá) vatapá pronto
  • Pimenta-malagueta a gosto pimenta-malagueta (optional)

Instructions 

  • Soak and blend the beans until smooth.
  • Mix in chopped onions, salt, and seasonings.
  • Heat oil and fry spoonfuls of the bean mixture until golden brown.
  • Fill with shrimp, vatapá, and optional chili.

Notes

Use fresh ingredients for best flavor and texture.
Calories: 350kcal
Cost: $15
Course: Snack
Cuisine: Brazilian
Keyword: Acarajé

Are you ready to indulge in a delightful Brazilian dessert that will make your taste buds dance? I’m talking about the creamy, luscious Pudim de Leite Condensado! This sweet treat is not only a crowd-pleaser but also incredibly easy to make. If you’re looking for a dessert that can impress your family and friends without spending hours in the kitchen, you’ve come to the right place! Plus, it’s a fantastic way to wrap up those quick family dinners or even serve alongside your favorite easy pasta recipes. Let’s dive into this delicious journey!

Why You’ll Love This Recipe

  • Simple ingredients that you probably already have at home.
  • Perfect for any occasion, from weeknight dinner ideas to special celebrations.
  • It’s a make-ahead dessert, so you can prepare it in advance!
  • Rich, creamy texture that melts in your mouth.
  • Impressive enough to wow your guests!

Ingredients

To make the perfect Pudim de Leite Condensado, you’ll need the following ingredients:

  • 1 can of sweetened condensed milk
  • 2 cups of whole milk
  • 3 large eggs
  • 1 cup of sugar (for caramel)
  • 1 teaspoon of vanilla extract

Full ingredient list with measurements is provided in the printable recipe card below.

How to Make the Recipe

Now, let’s get to the fun part! Here’s how to make this creamy delight in just five easy steps:

  1. Prepare the Caramel: In a saucepan over medium heat, melt the sugar until it turns golden brown. Quickly pour the caramel into a round baking dish, swirling it around to coat the bottom evenly.
  2. Blend the Ingredients: In a blender, combine the sweetened condensed milk, whole milk, eggs, and vanilla extract. Blend until smooth and creamy.
  3. Pour the Mixture: Carefully pour the blended mixture over the caramel in the baking dish.
  4. Bake: Preheat your oven to 350°F (175°C). Place the baking dish in a larger baking pan filled with water (this is called a water bath). Bake for about 1 hour or until the pudim is set.
  5. Cool and Serve: Once baked, let it cool to room temperature, then refrigerate for at least 4 hours. To serve, run a knife around the edges and invert onto a plate.

Pro Tips for Making the Recipe

Here are some helpful suggestions to ensure your Pudim de Leite Condensado turns out perfectly:

  • Make sure to blend the ingredients well to achieve that creamy texture.
  • Don’t rush the caramel; it should be a beautiful golden color for the best flavor.
  • If you want to add a twist, consider infusing the milk with a bit of orange zest or coconut for a tropical flair!
  • For a smoother pudim, strain the mixture before pouring it into the baking dish.

How to Serve

This pudim is best served chilled, making it a refreshing dessert after a hearty meal. Pair it with a cup of coffee or tea for a delightful end to your day. You can also garnish it with fresh berries or a sprinkle of grated chocolate for an extra touch of elegance. It’s perfect for those weeknight dinner ideas when you want to impress without the stress!

Make Ahead and Storage

The beauty of Pudim de Leite Condensado is that it can be made ahead of time. Just prepare it a day or two in advance and store it in the refrigerator. It will keep well for up to a week, so you can enjoy it throughout the week or serve it at your next gathering. Just remember to cover it with plastic wrap to keep it fresh!

So there you have it! A simple yet elegant dessert that’s sure to become a favorite in your home. Whether you’re looking for a sweet treat to accompany your easy pasta recipes or a show-stopping dessert for a special occasion, this Pudim de Leite Condensado is the answer. Give it a try, and I promise you won’t be disappointed!

Pudim de Leite Condensado

Prep Time 15 minutes
Cook Time 1 hour
Total Time 1 hour 15 minutes
Servings 8 pieces
Calories 350
A classic Brazilian dessert, creamy and sweet, perfect for special occasions or everyday indulgence.

Ingredients

group

  • 1 lata leite condensado ((395 g))
  • 1 lata leite integral (use a lata do leite condensado como medida)
  • 3 units ovos inteiros
  • 1 cup açúcar ((calda))
  • 0.5 cup água ((calda))

Instructions 

  • Prepare the caramel by heating sugar and water until golden, then pour into a mold.
  • Blend condensed milk, whole milk, and eggs until smooth.
  • Pour the mixture into the caramel-lined mold.
  • Bake in a water bath at 350°F (180°C) for about 45 minutes or until set.
  • Let cool, then refrigerate for at least 4 hours before serving.

Notes

Ensure the caramel is golden but not burnt for the best flavor.
Calories: 350kcal
Cost: $15
Course: Dessert
Cuisine: Brazilian
Keyword: caramel

Are you ready to spice up your weeknight dinners with a dish that’s not only delicious but also incredibly easy to make? I’m thrilled to share my recipe for Frango Xadrez Fácil e Delicioso, a delightful Chinese-inspired chicken dish that’s packed with flavor and can be whipped up in no time! This recipe is perfect for those busy evenings when you need quick family dinners that everyone will love. Plus, it’s a fantastic addition to your collection of easy pasta recipes!

Why You’ll Love This Recipe

  • Quick and easy to prepare, making it ideal for busy weeknights.
  • Flavorful combination of chicken, vegetables, and peanuts.
  • Perfect for the whole family, even picky eaters!
  • Can be served over rice or noodles for a complete meal.
  • Great for meal prep and leftovers!

Ingredients

To make this scrumptious Frango Xadrez, you’ll need the following ingredients:

  • 1 lb chicken breast, cut into bite-sized pieces
  • 1 bell pepper, sliced
  • 1 onion, sliced
  • 1 cup broccoli florets
  • 1/2 cup peanuts
  • 3 cloves garlic, minced
  • 1/4 cup soy sauce
  • 2 tablespoons cornstarch
  • 2 tablespoons vegetable oil
  • Salt and pepper to taste

Full ingredient list with measurements is provided in the printable recipe card below.

How to Make the Recipe

Now, let’s dive into the cooking process! Follow these simple steps to create your Frango Xadrez:

  1. In a large skillet, heat the vegetable oil over medium-high heat.
  2. Add the chicken pieces and season with salt and pepper. Cook until browned, about 5-7 minutes.
  3. Stir in the garlic, bell pepper, onion, and broccoli. Sauté for another 3-4 minutes until the vegetables are tender.
  4. In a small bowl, mix the soy sauce and cornstarch until smooth. Pour this mixture over the chicken and vegetables, stirring to coat everything evenly.
  5. Cook for an additional 2-3 minutes until the sauce thickens.
  6. Finally, stir in the peanuts and cook for another minute. Serve hot!

Pro Tips for Making the Recipe

Here are some of my favorite tips to ensure your Frango Xadrez turns out perfectly every time:

  • Feel free to mix and match your favorite vegetables! Carrots, snap peas, or even mushrooms work wonderfully.
  • If you like a bit of heat, add some red pepper flakes or a splash of sriracha to the sauce.
  • For a creamier texture, consider adding a splash of coconut milk or a dollop of sour cream at the end.
  • This dish is also great for meal prep! Make a double batch and enjoy it throughout the week.

How to Serve

Frango Xadrez is incredibly versatile! Here are some serving suggestions:

  • Serve it over steamed rice for a hearty meal.
  • Pair it with noodles for a delightful twist—try it with some creamy garlic pasta for a fusion experience!
  • Garnish with fresh cilantro or green onions for an extra pop of flavor.
  • This dish also makes a fantastic filling for wraps or lettuce cups!

Make Ahead and Storage

If you’re looking for easy weeknight dinner ideas, this Frango Xadrez is perfect for making ahead! Here’s how to store it:

  • Store leftovers in an airtight container in the refrigerator for up to 3 days.
  • To reheat, simply warm it in a skillet over medium heat until heated through.
  • You can also freeze the dish for up to 2 months. Just make sure to let it cool completely before transferring it to a freezer-safe container.

So there you have it! A quick, easy, and delicious recipe that’s sure to become a family favorite. I can’t wait for you to try this Frango Xadrez and see how it brightens up your dinner table. Enjoy your cooking adventure!

Frango Xadrez Fácil e Delicioso

Prep Time 15 minutes
Cook Time 20 minutes
Total Time 35 minutes
Servings 4 servings
Calories 350
Uma deliciosa receita de frango xadrez que combina sabores orientais com ingredientes simples, perfeita para uma refeição rápida e saborosa.

Ingredients

Protein

  • 500 g de peito de frango cortado em cubos

Oils

  • 2 tablespoons de azeite de oliva
  • 1 teaspoon de óleo de gergelim (opcional)

Aromatics

  • 2 cloves de alho picados
  • 1 medium cebola picada em cubos

Vegetables

  • ½ pimentão verde em cubos
  • ½ pimentão vermelho em cubos
  • ½ pimentão amarelo em cubos
  • 1 cup de cogumelos em conserva cortados ao meio

Sauces and liquids

  • ¼ cup de molho shoyu
  • ½ cup de água
  • 1 tablespoon de amido de milho

Nuts

  • 2 tablespoons de amendoim torrado

Seasonings

  • Sal e pimenta-do-reino a gosto Sal e pimenta-do-reino a gosto

Instructions 

  • Tempere o frango em cubos com sal e pimenta-do-reino.
  • Refogue o alho e a cebola no azeite até ficarem dourados.
  • Adicione os pimentões e os cogumelos, refogando por 3 minutos.
  • Junte o frango e refogue até ficar cozido.
  • Adicione o molho shoyu, a água e o amido de milho, mexendo até engrossar.
  • Polvilhe o amendoim torrado e sirva quente.

Notes

Sirva com arroz branco para uma refeição completa.
Calories: 350kcal
Cost: $15
Course: Main Course
Cuisine: Chinese
Keyword: chicken

Have you ever craved a dessert that’s not only delicious but also brings a taste of home? Well, let me introduce you to Curau de Milho Cremoso! This creamy corn pudding is a delightful treat that’s perfect for any occasion. Whether you’re looking for a sweet ending to a family dinner or a special dessert to impress your friends, this recipe is sure to become a favorite. Plus, it’s as easy as pie—well, easier! If you love easy pasta recipes for quick family dinners, you’ll adore how simple this dessert is to whip up!

Why You’ll Love This Recipe

  • It’s made with fresh corn, giving it a delightful sweetness.
  • Perfectly creamy texture that melts in your mouth.
  • Quick to prepare, making it ideal for 30-minute meals.
  • Versatile—enjoy it warm or chilled!
  • A unique dessert that will wow your guests.

Ingredients

To make this delicious Curau de Milho Cremoso, you’ll need the following ingredients:

  • 4 ears of fresh corn
  • 4 cups of milk
  • 1 cup of sugar
  • 1 teaspoon of vanilla extract
  • 1/4 teaspoon of salt
  • 1 tablespoon of cornstarch (optional, for extra thickness)

Full ingredient list with measurements is provided in the printable recipe card below.

How to Make the Recipe

Now, let’s dive into the steps to create this creamy delight:

  1. Start by husking the corn and removing the kernels from the cob. You can use a sharp knife to cut the kernels off easily.
  2. In a blender, combine the corn kernels with 2 cups of milk. Blend until smooth.
  3. Pour the corn mixture into a saucepan and add the remaining milk, sugar, vanilla extract, and salt. Stir well.
  4. Cook over medium heat, stirring constantly, until the mixture thickens (about 10-15 minutes). If you want a thicker consistency, mix the cornstarch with a little cold milk and add it to the saucepan.
  5. Once thickened, remove from heat and let it cool slightly before serving.
  6. Serve warm or chilled, and enjoy!

Pro Tips for Making the Recipe

Here are some helpful suggestions to ensure your Curau de Milho Cremoso turns out perfectly:

  • Use fresh corn for the best flavor. Frozen corn can work in a pinch, but nothing beats the taste of fresh!
  • Don’t rush the cooking process; stirring constantly helps prevent sticking and ensures a smooth texture.
  • Feel free to adjust the sugar to your taste. If you prefer a less sweet dessert, reduce the sugar by half.
  • For a fun twist, try adding a sprinkle of cinnamon or nutmeg on top before serving.

How to Serve

Curau de Milho Cremoso is incredibly versatile! Here are some serving suggestions:

  • Serve it in individual bowls for a charming presentation.
  • Top with whipped cream or a dollop of crème fraîche for added richness.
  • Pair it with fresh fruit like berries or sliced bananas for a refreshing contrast.
  • Enjoy it as a sweet side dish alongside your favorite weeknight dinner ideas.

Make Ahead and Storage

This dessert is perfect for meal prep! Here’s how to store it:

  • Curau de Milho Cremoso can be made a day in advance. Just store it in an airtight container in the refrigerator.
  • To reheat, simply warm it on the stove over low heat, stirring gently until heated through.
  • It can last in the fridge for up to 3 days, but I doubt it will last that long because it’s so delicious!

So there you have it! A delightful recipe for Curau de Milho Cremoso that’s sure to impress your family and friends. Whether you’re enjoying it as a sweet treat after a hearty meal or serving it at a gathering, this creamy corn pudding is bound to be a hit. And if you’re looking for more quick and easy ideas, don’t forget to check out my collection of creamy garlic pasta and other easy pasta recipes for your next weeknight dinner ideas. Happy cooking!

Curau de Milho Cremoso

Prep Time 15 minutes
Cook Time 20 minutes
Total Time 35 minutes
Servings 6 servings
Calories 250
A creamy Brazilian corn dessert with a rich, sweet flavor and aromatic cinnamon topping.

Ingredients

Main ingredients

  • 5 espigas milho verde
  • 1 litro leite integral
  • 1.5 xícaras açúcar
  • 1 pitada sal
  • a gosto a gosto canela em pó (para polvilhar)

Instructions 

  • Debulhe o milho: lave bem as espigas e retire os grãos.
  • Mode de Preparo: Em um liquidificador, adicione o milho, o leite e o açúcar. Bata por 3 minutos até obter uma mistura homogênea.
  • Coe a mistura: Coe o creme para remover os resíduos sólidos, usando uma peneira fina.
  • Prepare o creme: Em uma panela, coloque o creme coado, adicione o sal e leve ao fogo baixo. Mexa sempre até engrossar, cerca de 10 minutos.
  • Coe o creme: Passe a mistura por uma peneira fina para garantir uma textura lisa.
  • Finalize: Despeje o creme em taças ou tigelas, polvilhe canela em pó a gosto e sirva frio.

Notes

Use uma peneira fina para obter uma textura mais cremosa.
Calories: 250kcal
Cost: $15
Course: Dessert
Cuisine: Brazilian
Keyword: corn

Are you ready to elevate your churrasco experience? I know I am! Today, I’m excited to share my favorite recipe for Pão de Alho Caseiro para Churrasco, a delicious garlic bread that will make your taste buds dance with joy. This recipe is not only perfect for those summer barbecues but also fits seamlessly into your quick family dinners. Plus, it’s so easy to whip up that you’ll want to make it every week! Let’s dive into this delightful journey of flavors!

Why You’ll Love This Recipe

  • It’s incredibly easy to make, perfect for busy weeknight dinner ideas.
  • Pairs beautifully with grilled meats, making it a must-have for any churrasco.
  • Uses simple ingredients you probably already have in your pantry.
  • Can be made in under 30 minutes, making it a fantastic option for quick family dinners.
  • It’s a crowd-pleaser that will impress your family and friends!

Ingredients

To make this scrumptious Pão de Alho Caseiro para Churrasco, you’ll need the following ingredients:

  • 1 cup unsalted butter, softened
  • 1 head of garlic, minced
  • 1/4 cup fresh parsley, chopped
  • 1 teaspoon salt
  • 1/2 teaspoon black pepper
  • 1 loaf of French bread or Italian bread

Full ingredient list with measurements is provided in the printable recipe card below.

How to Make the Recipe

Now, let’s get cooking! Follow these simple steps to create your own Pão de Alho:

  1. Preheat your oven to 375°F (190°C).
  2. In a mixing bowl, combine the softened butter, minced garlic, chopped parsley, salt, and black pepper. Mix until well combined.
  3. Slice the loaf of bread in half lengthwise. Spread the garlic butter mixture generously on both halves.
  4. Wrap the bread in aluminum foil and place it on a baking sheet.
  5. Bake in the preheated oven for about 15-20 minutes, or until the bread is warm and the butter has melted.
  6. For an extra crispy finish, unwrap the foil and bake for an additional 5 minutes.
  7. Remove from the oven, slice, and serve warm!

Pro Tips for Making the Recipe

Here are some of my favorite tips to ensure your Pão de Alho turns out perfectly every time:

  • Feel free to adjust the amount of garlic based on your preference. If you love garlic, go for it!
  • For a twist, add some grated Parmesan cheese to the butter mixture for a cheesy garlic bread.
  • Make sure your butter is softened to room temperature for easy spreading.
  • If you’re short on time, you can use store-bought garlic butter instead of making your own.
  • This recipe is also great for using up leftover bread!

How to Serve

Serving your Pão de Alho is just as fun as making it! Here are some ideas:

  • Serve it alongside your favorite grilled meats at your next barbecue.
  • Pair it with a fresh salad for a light weeknight dinner idea.
  • Use it as a side for creamy garlic pasta dishes for a delightful combination.
  • Enjoy it as a snack with a glass of wine while catching up with friends.

Make Ahead and Storage

If you want to prepare this delicious garlic bread ahead of time, you can! Here’s how:

  • Prepare the garlic butter mixture and spread it on the bread, then wrap it tightly in foil and refrigerate for up to 24 hours.
  • When you’re ready to bake, simply pop it in the oven as directed.
  • Leftover Pão de Alho can be stored in an airtight container in the fridge for up to 3 days. Reheat in the oven for the best results.

So there you have it! A simple yet delicious recipe for Pão de Alho Caseiro para Churrasco that will surely become a staple in your home. Whether you’re looking for quick family dinners or just a tasty side to complement your meals, this garlic bread is the answer. Enjoy every bite, and happy cooking!

Pão de Alho Caseiro para Churrasco

Prep Time 15 minutes
Cook Time 10 minutes
Total Time 25 minutes
Servings 6 pieces
Calories 250
Delicious homemade garlic bread perfect for barbecue gatherings, combining rich flavors and easy preparation.

Ingredients

Bread

  • 6 pieces pães franceses (preferencialmente amanhecidos)
  • 4 tablespoons maionese
  • 2 tablespoons requeijão cremoso
  • 3 tablespoons alho triturado ou picado
  • 2 tablespoons manteiga derretida
  • 1 tablespoon cheiro-verde picado
  • 1 teaspoon orégano fresco ou seco
  • ½ cup queijo parmesão ralado
  • to taste Sal e pimenta-do-reino

Instructions 

  • Prepare a garlic paste by mixing the crushed garlic with mayonnaise, requeijão, melted butter, chopped parsley, and oregano.
  • Slice the bread and spread the garlic mixture evenly over each piece.
  • Sprinkle grated Parmesan cheese on top of each piece.
  • Wrap the bread in aluminum foil and bake at 180°C (356°F) for about 15 minutes or until golden and crispy.

Notes

For extra flavor, add a touch of chili flakes or grated cheese before baking.
Calories: 250kcal
Cost: $15
Course: Side Dish
Cuisine: Brazilian
Keyword: garlic bread